Bacon Grease Soap
This simple bacon grease soap recipe creates long-lasting bars with a creamy, bubbly lather. Made with just four ingredients—rendered bacon fat, coconut oil, lye, and water—it’s an easy, natural soap that’s both moisturizing and effective.
Yield: 7 bars
Cost: $10
Equipment
- 1 immersion blender
- 1 double boiler or heat proof bowl 2 quart capacity
- 1 silicone spatula
- 1 1 small heat proof container 2 cup capacity
- 1 pair safety glasses
- 1 pair rubber gloves
- 1 scale
- 2 soap molds 6 cavity
- 1 infrared thermometer
Materials
- 400 g purified bacon grease
- 100 g coconut oil unrefined
- 190 g cold water
- 71 g lye
- 50 g coarse Himalayan salt optional
Instructions
Purify Bacon Grease:
- Scoop the bacon grease out of the storage jars and place it into a pot along with 1 cups of water and 1/2 tablespoon sea salt. If you're purifying large quantities of bacon grease, use a larger pot and add more water and salt keeping the 1 cup : 1 /2 tablespoon ratio.
- Re-melt the grease and bring to a low simmer for 10-15 minutes. During the simmering, skim off any foam or impurities that float along the surface.After simmering, strain the liquid into a clean stainless steel bowl and allow to harden in the fridge, at least until completely solidified. This will allow the fat and any remaining moisture to separate.
- Once solidified, remove the fat from the surface and discard any remaining water. Scrape any impurities from the bottom of the fat disc, and repeat the process, adding water and salt until no impurities remain. When the water under the fat disc is clear and no impurities need to be scraped off, you can melt down the fat once more, without any water or salt, then transfer to storage jars until you're ready to make soap, or wipe the fat dry with paper towels, and chop it before transferring to a storage container.
Make Lye Solution:
- Put on your safety glasses and rubber gloves. Weigh 190g cold water in a heat proof container with at least 500 ml capacity. I use a 2 cup glass pyrex jar. Weigh 71g lye crystals into a separate container. Carefully pour the lye into the water and stir well. Steam, fumes, and heat are byproducts of this chemical reaction and are very normal, but be cautious to not burn yourself or inhale the fumes.
- Set the lye somewhere safe to cool, in the kitchen sink is a great place - if it spills, it can be quickly and easily diluted.
Prepare The Oils:
- Meanwhile, in a heat proof mixing container, add 400g purified bacon grease and 100g coconut oil. Melt the solid oils and fats until completely liquified and combined. You can use a double boiler or the microwave - in 30 second bursts.
Make Bacon Soap:
- Use your infrared thermometer to check the temperature of both the lye solution and oils. Once the lye solution is between 100 and 110f and the oils are within 10 degrees Fahrenheit, you can start soaping.
- Pour the lye solution into the heated oils and carefully place your immersion blender into the mixture, ensuring the blending head is covered at all times. Alternate between pulsing the blender on and off and stirring the mixture with a spatula. After pulsing and stirring for a while, the mixture will come to trace, which simply means it thickens. We're aiming for the consistency of pudding. You can tell it's come to trace by drizzling some of the soap batter on top of itself. If the drizzles stay and don't sink away instantly, you're in trace.
Transfer To Molds:
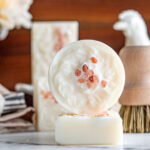
- Place the soap molds onto a tray or baking sheet. Pour the soap batter into the molds. This recipe perfectly fills a 6 cavity soap mold plus one extra. If you only have one mold, you can always pour the rest into another mold or something from around the house, like an ice cube tray, juice box, milk carton, anything with a smooth, shiny surface that the soap will pop out of. If desired, texture the top of the soap bars. You can use a spoon or a toothpick to add swirls. I added a row of coarse pink Himalayan salt for contrast.
- Move the baking sheet somewhere that the soap can set for 48 hours.
Cure The Soap:
- After 48 hours, remove the soap from the molds. If the soap does not easily pull away from the edges of the molds, it may need longer to set, but after 48 hours, it should be firm enough to remove. Use a peeler to remove the sharp edges from the sides of the soap bars. Set the soap bars on end in a place with good airflow and allow to cure for at least 4 weeks. The curing time is very important when it comes to cold process soaps, this allows the saponification process to complete, excess moisture to evaporate and improves the longevity and lather of your soaps.