Coop Tour
Interested to know more about our chicken coop and predator-proof run?
Start here!
We'll share all the tips and tricks you need to create a cozy and functional coop that both you and your chickens will love. Take a virtual tour of our coop, including the additions we've made to make it more comfortable and convenient for both us and our flock.
From the materials and products we've used to the design choices we made, we'll offer insights into our thought process and the reasoning behind each decision.
Whether you're looking for inspiration on how to add nesting boxes or keep the cold out, or just want to see how we've optimized our coop for functionality, we've got all the information you need to build a better coop.
Jump to:
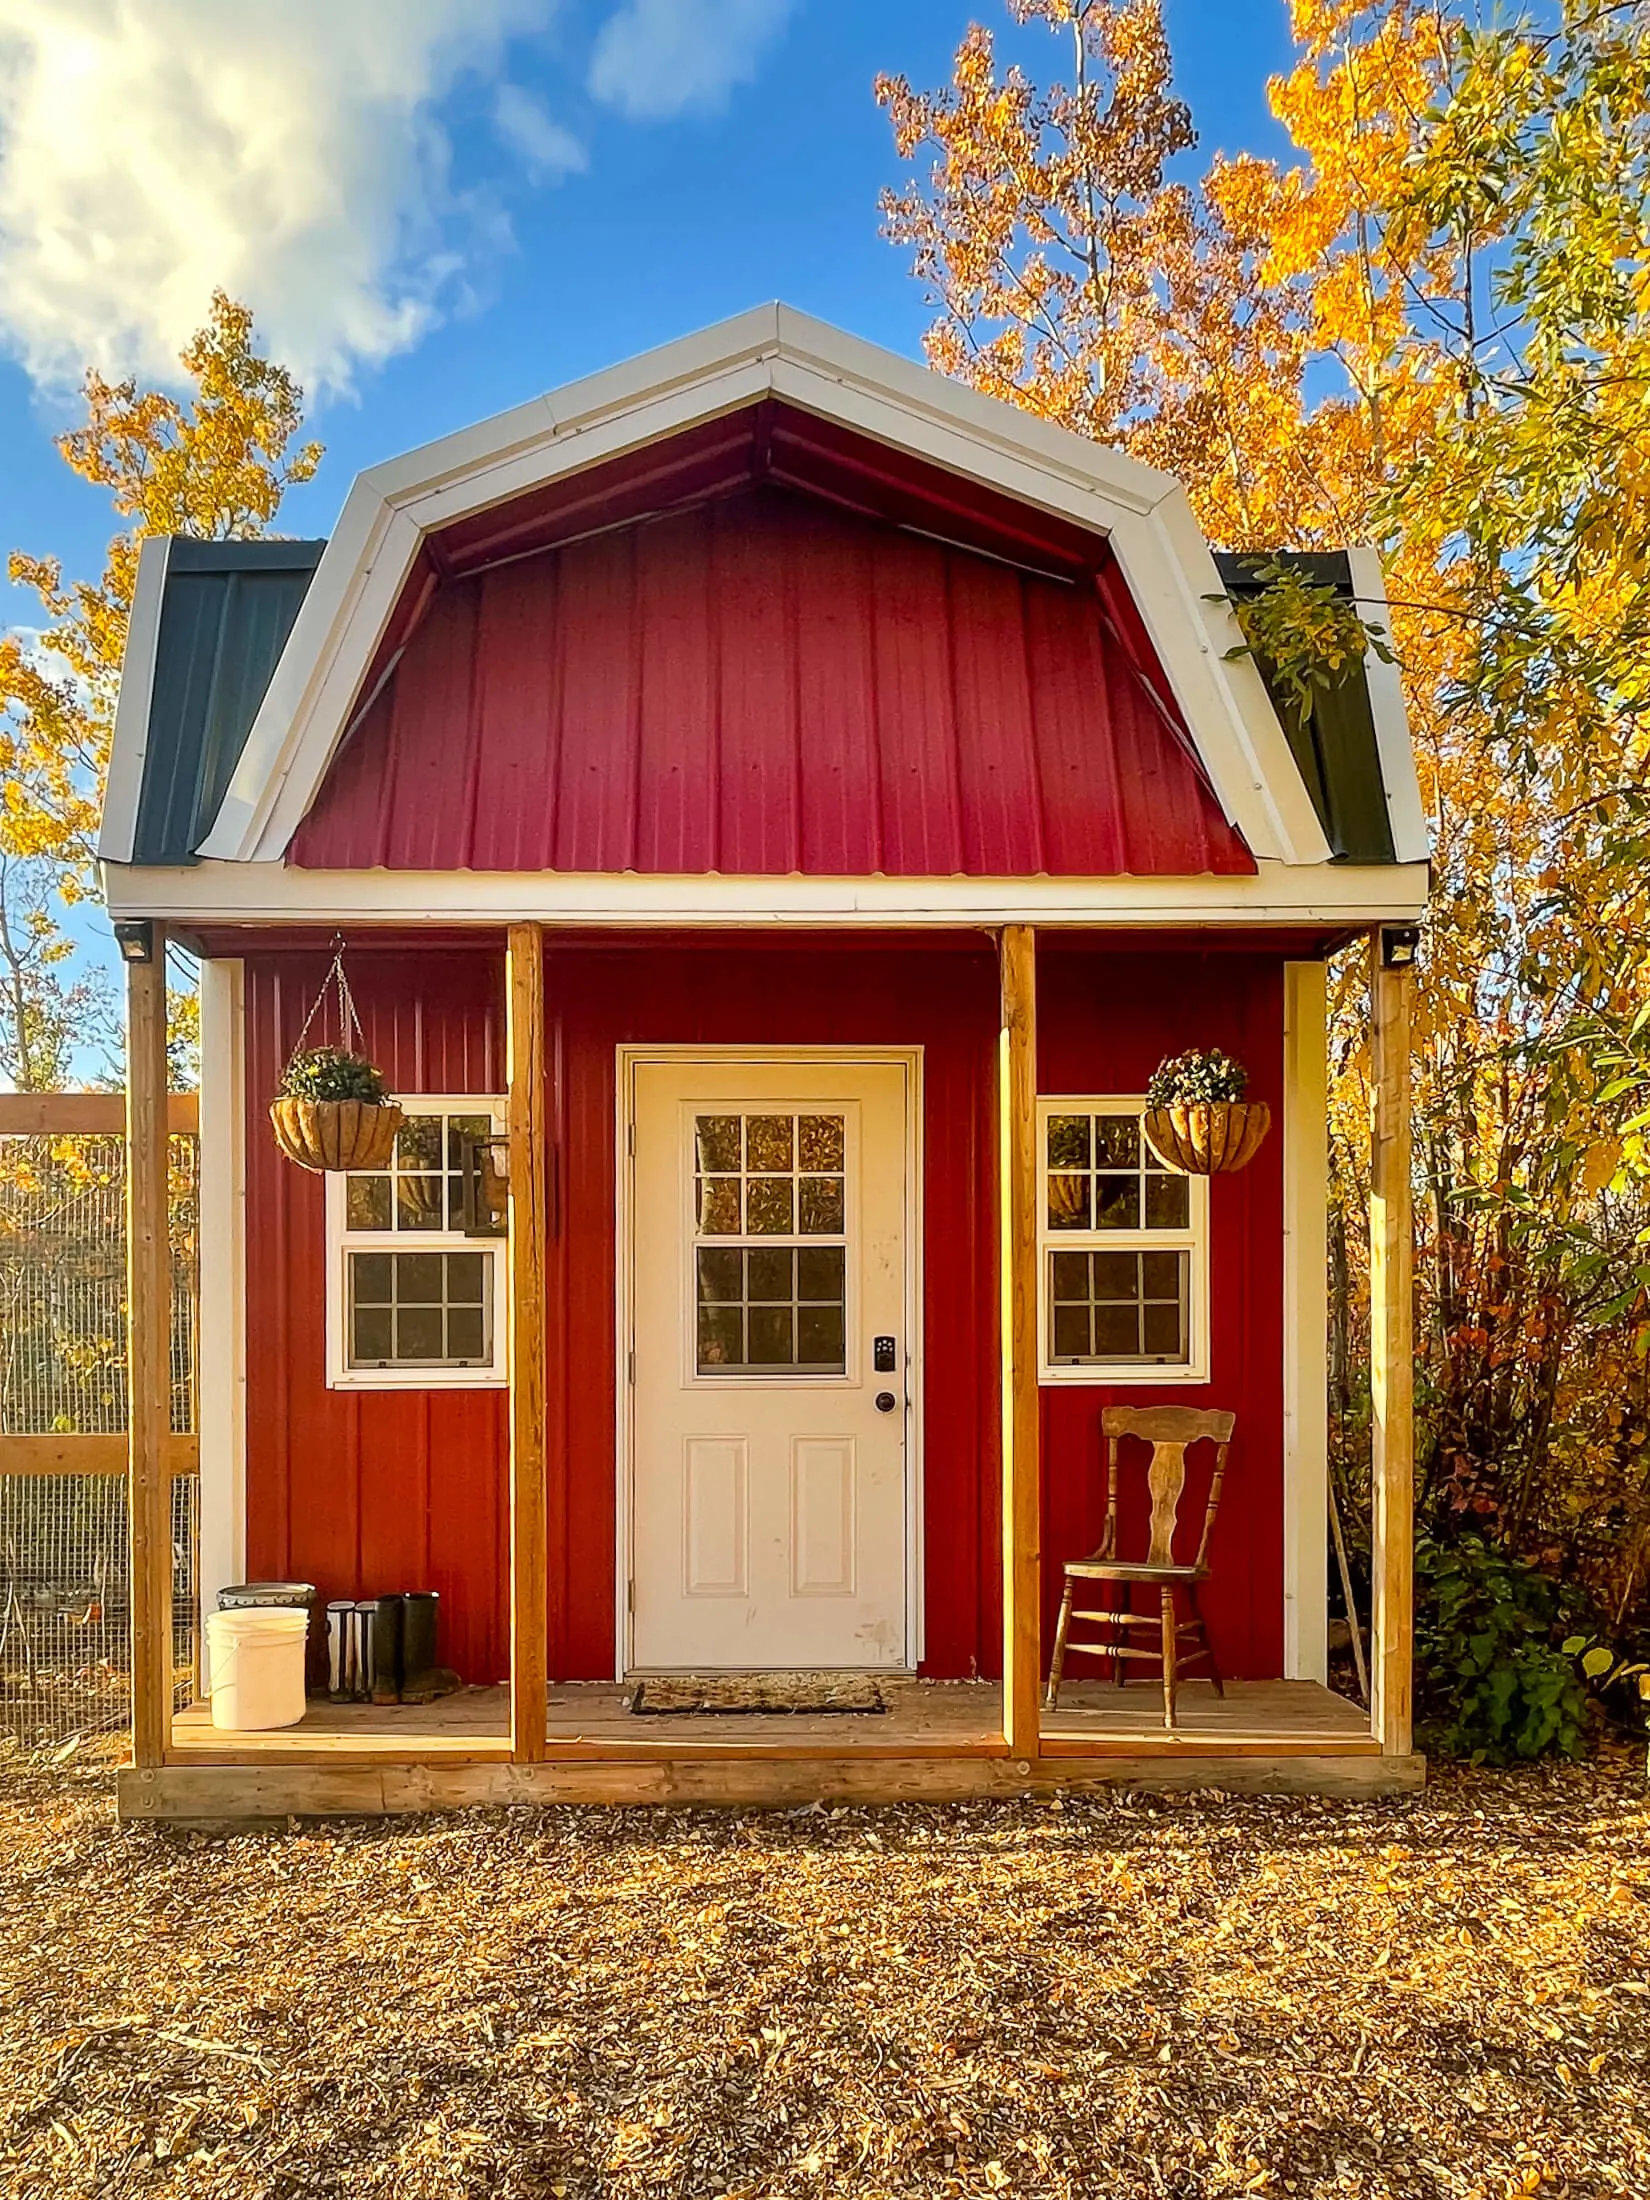
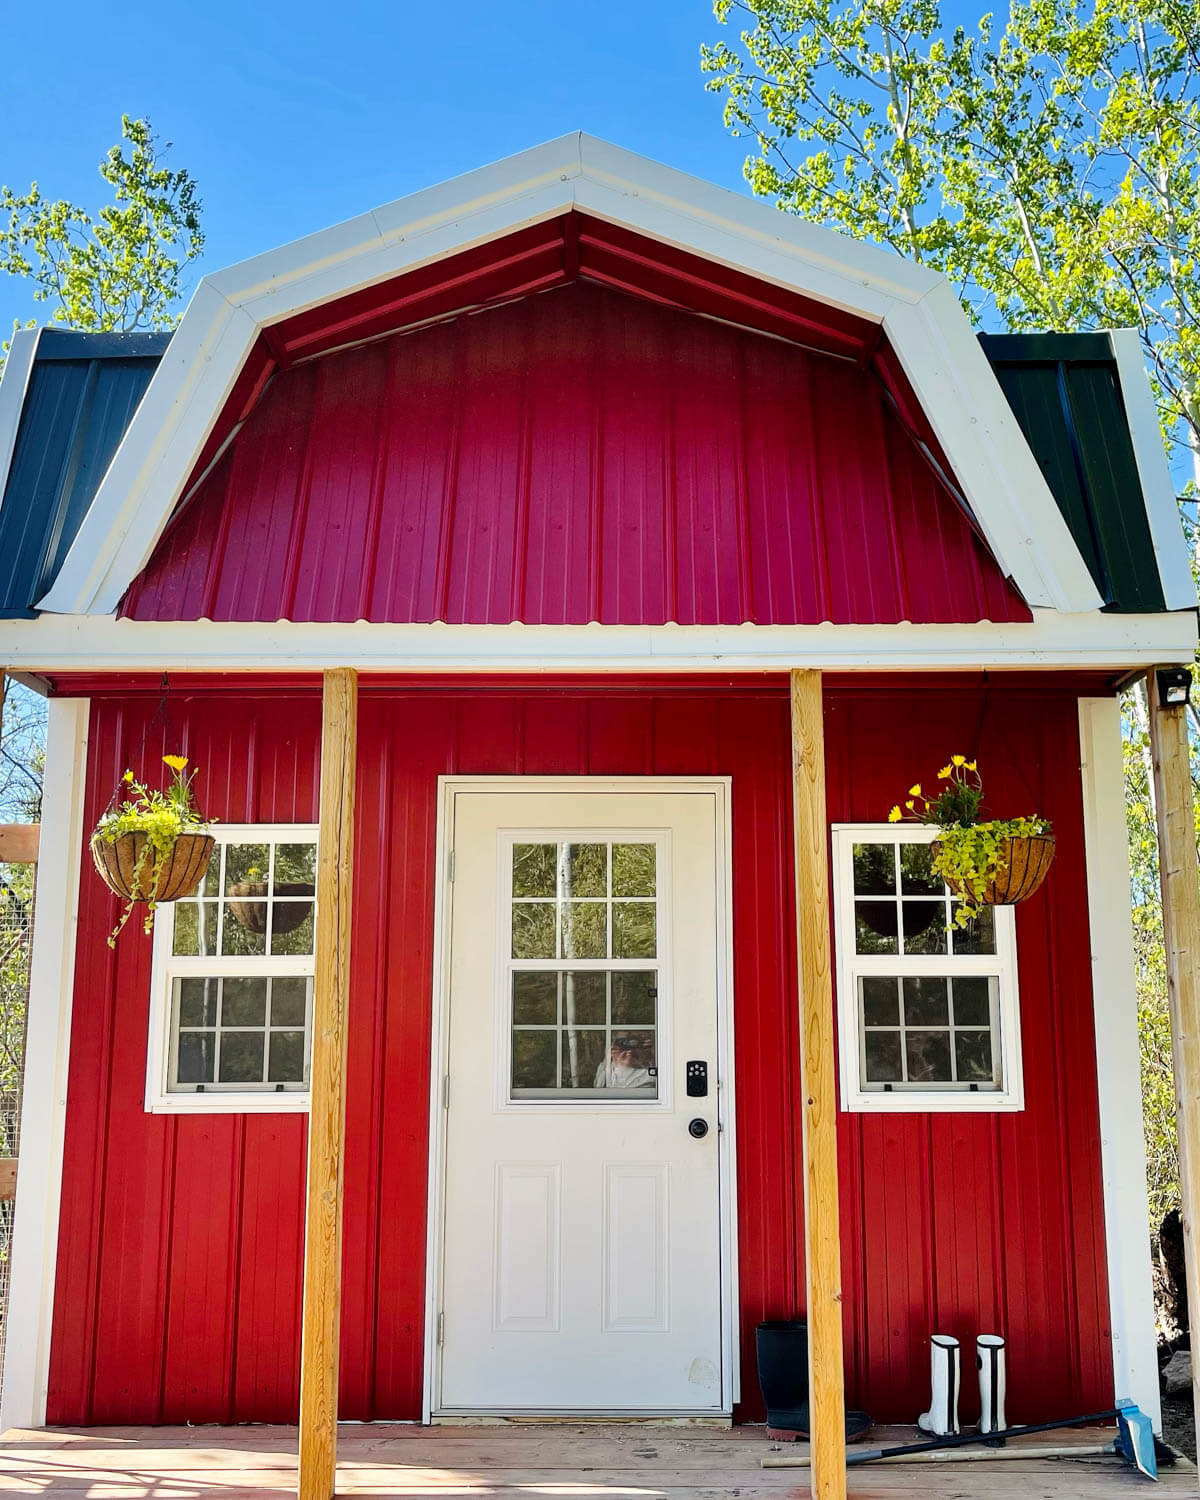
Chicken Coop
To say that Kevin and I fell into a bit of luck with this coop would be an understatement. We were discussing and designing our own coop when he struck up a conversation with his coworker who just happened to be selling a chicken coop.
This coop was too beautiful to pass up, so we started the process of planning the chicken run around the new coop.
This coop is 12x8' inside dimensions with a 2-foot deck on the front. The coop is fully insulated and finished inside with plywood.
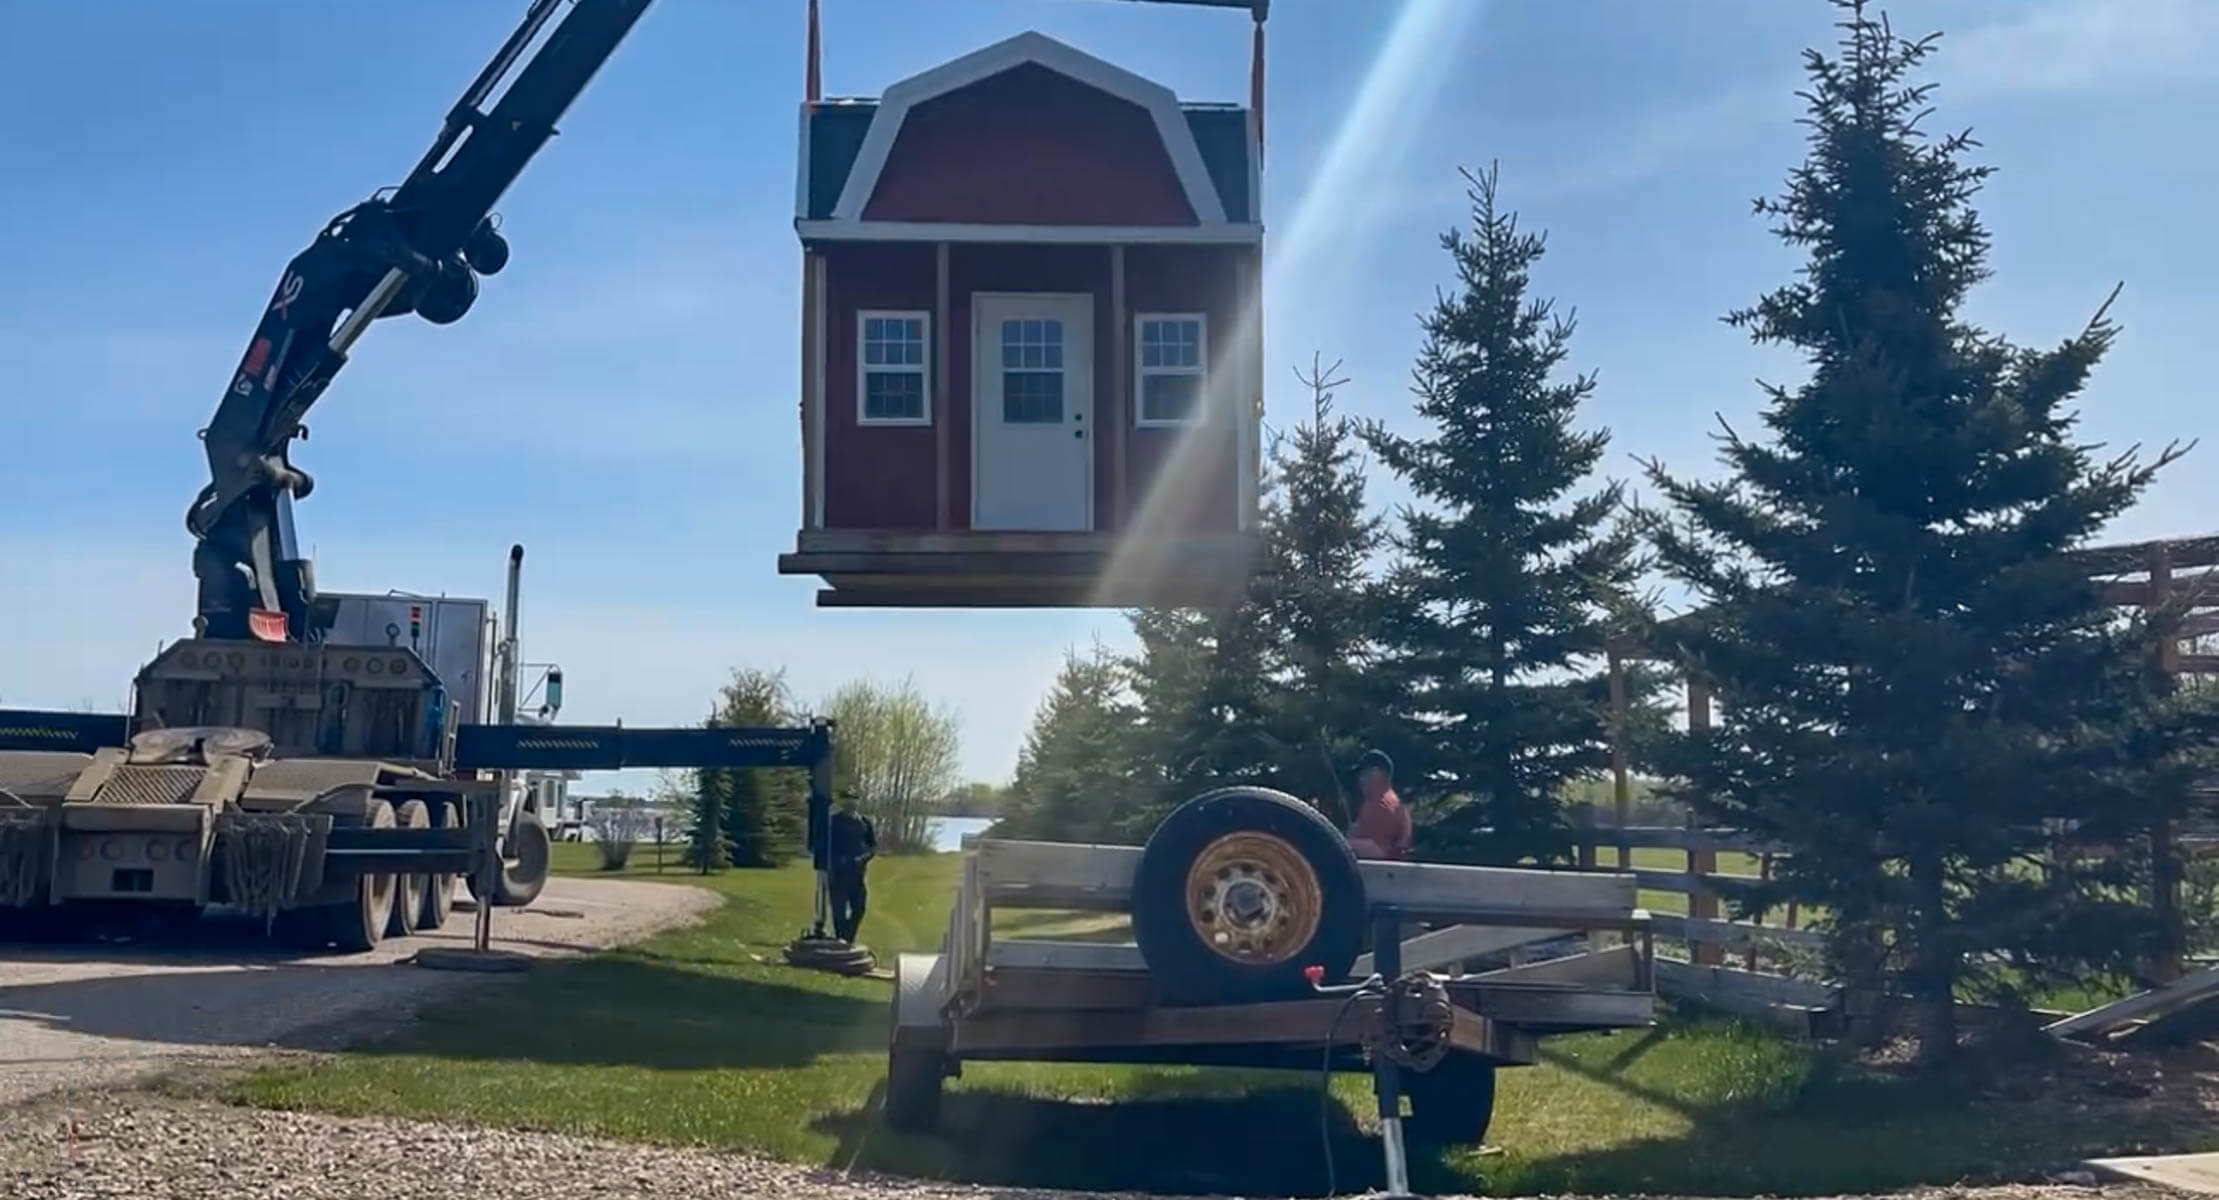
In order to get the coop home, we had to hire a picker truck to lift the building and load it onto a trailer, then unload it here at the homestead. This was maybe not the most economical method of moving a building, but it was quick, easy, and safe.
Because we decided to use a picker to move the building, Kevin and I were able to start construction on the run prior to the building being moved, so when it arrived home, it was placed right next to the pre-constructed section of the run and we continued on with our progress.
We placed the coop with the front door and windows facing south so they would be able to capture sunlight and heat during the colder months while the sun is low in the southern sky.
Inside The Coop
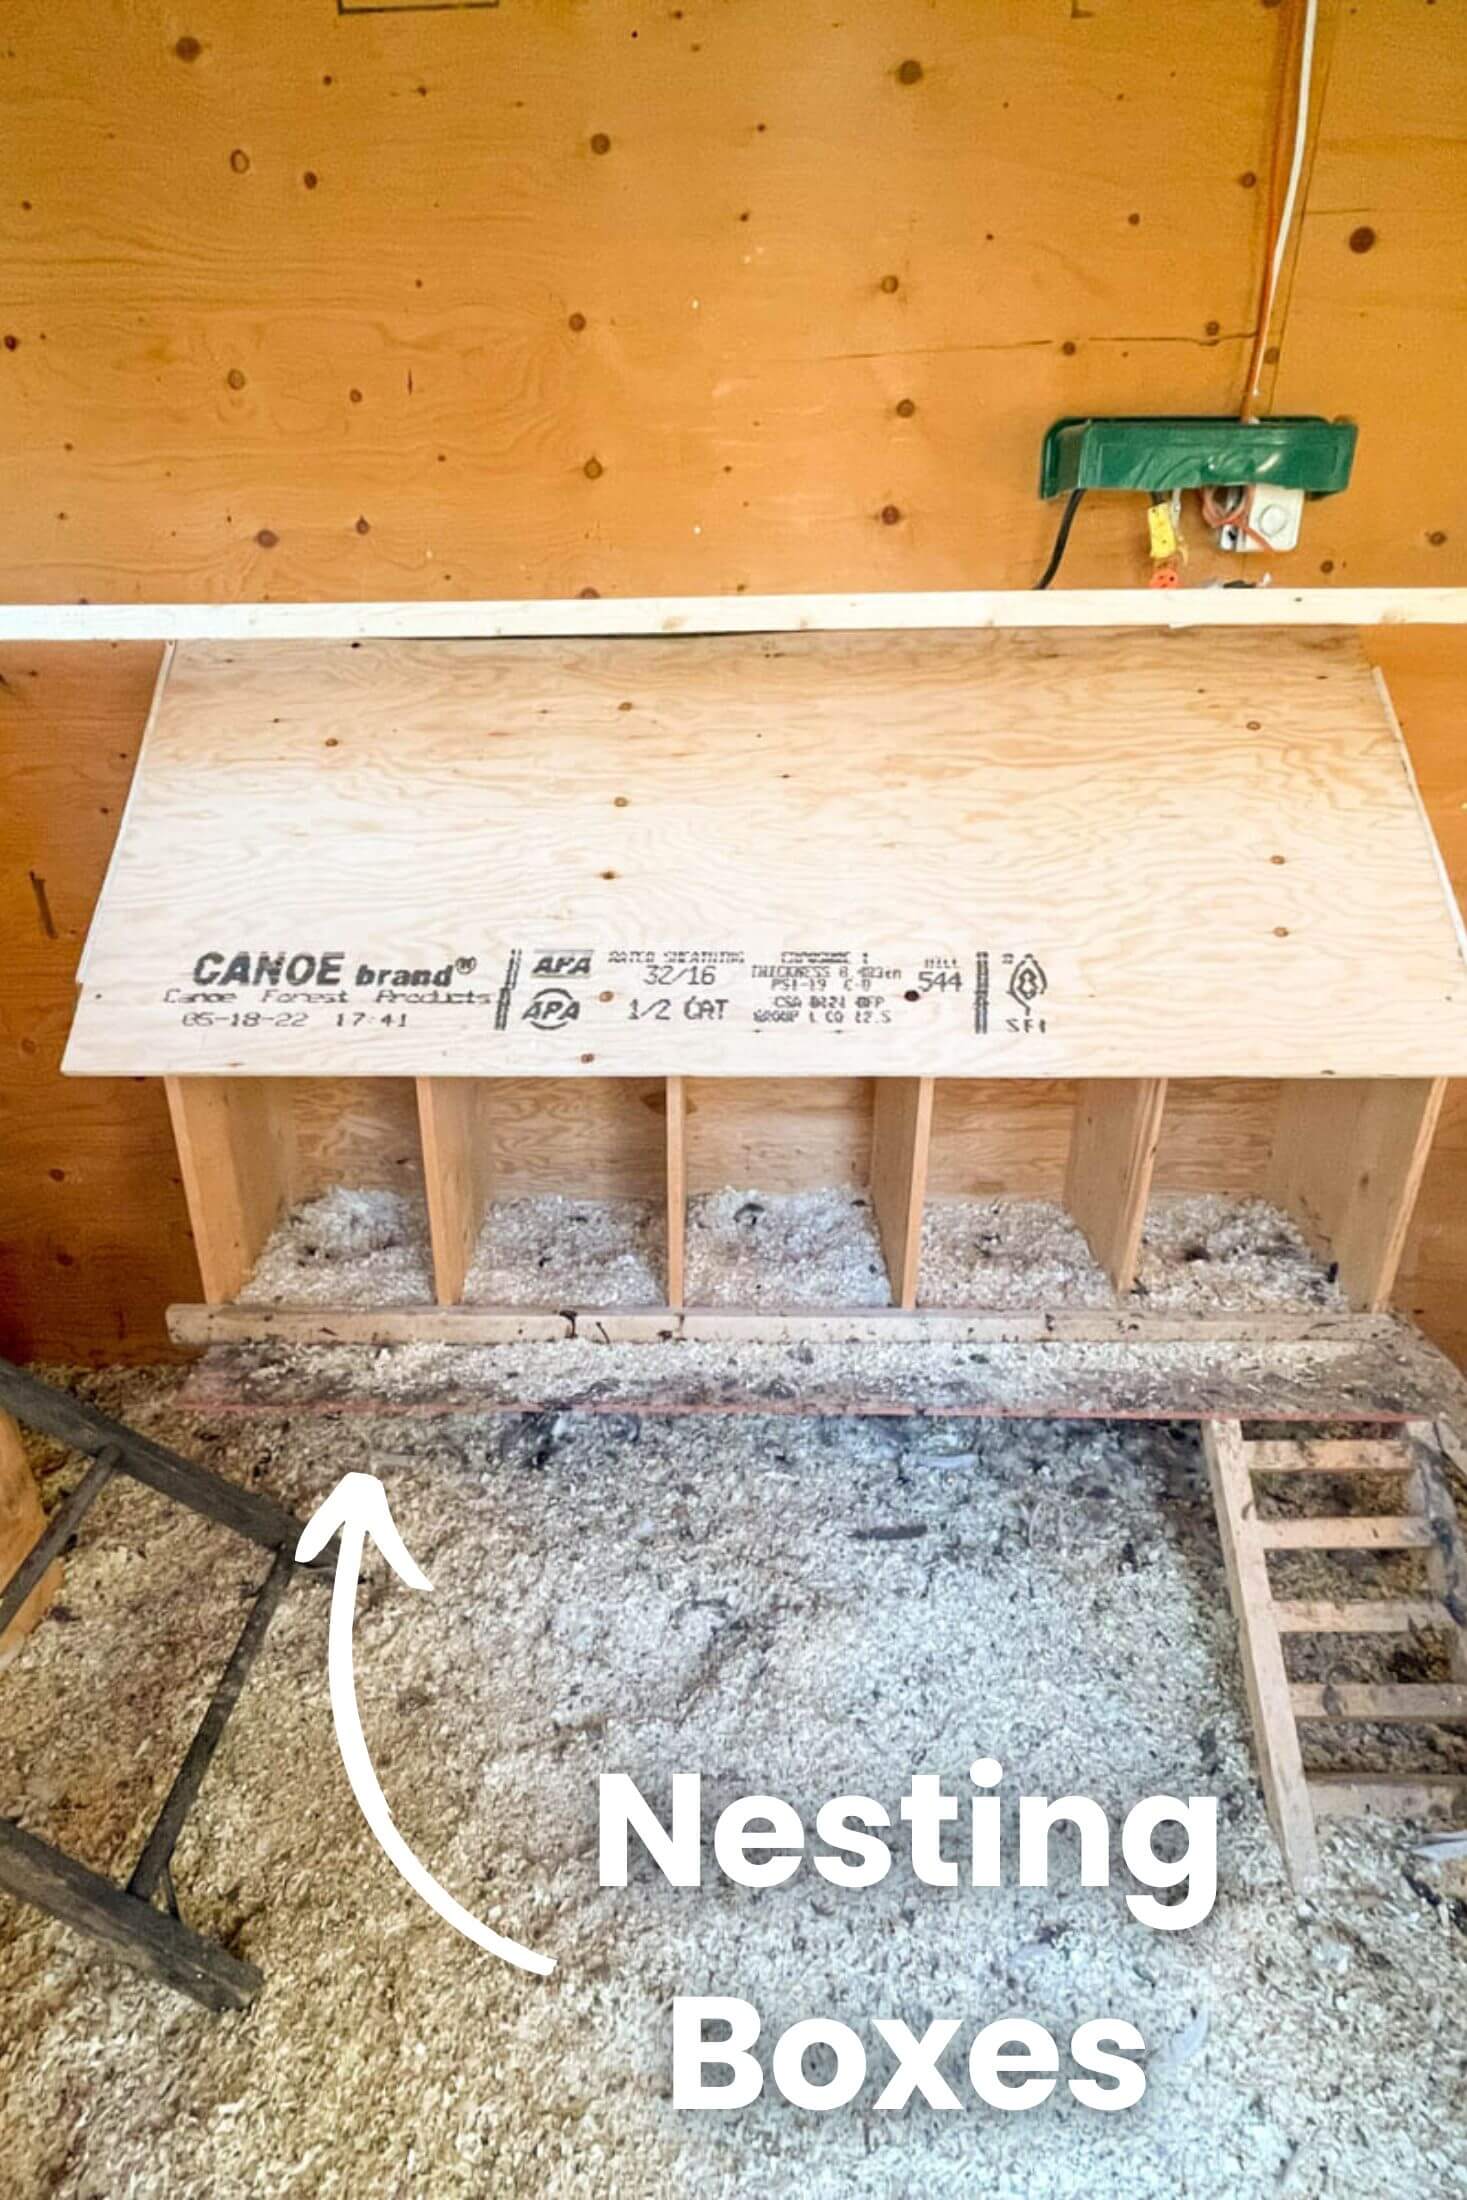
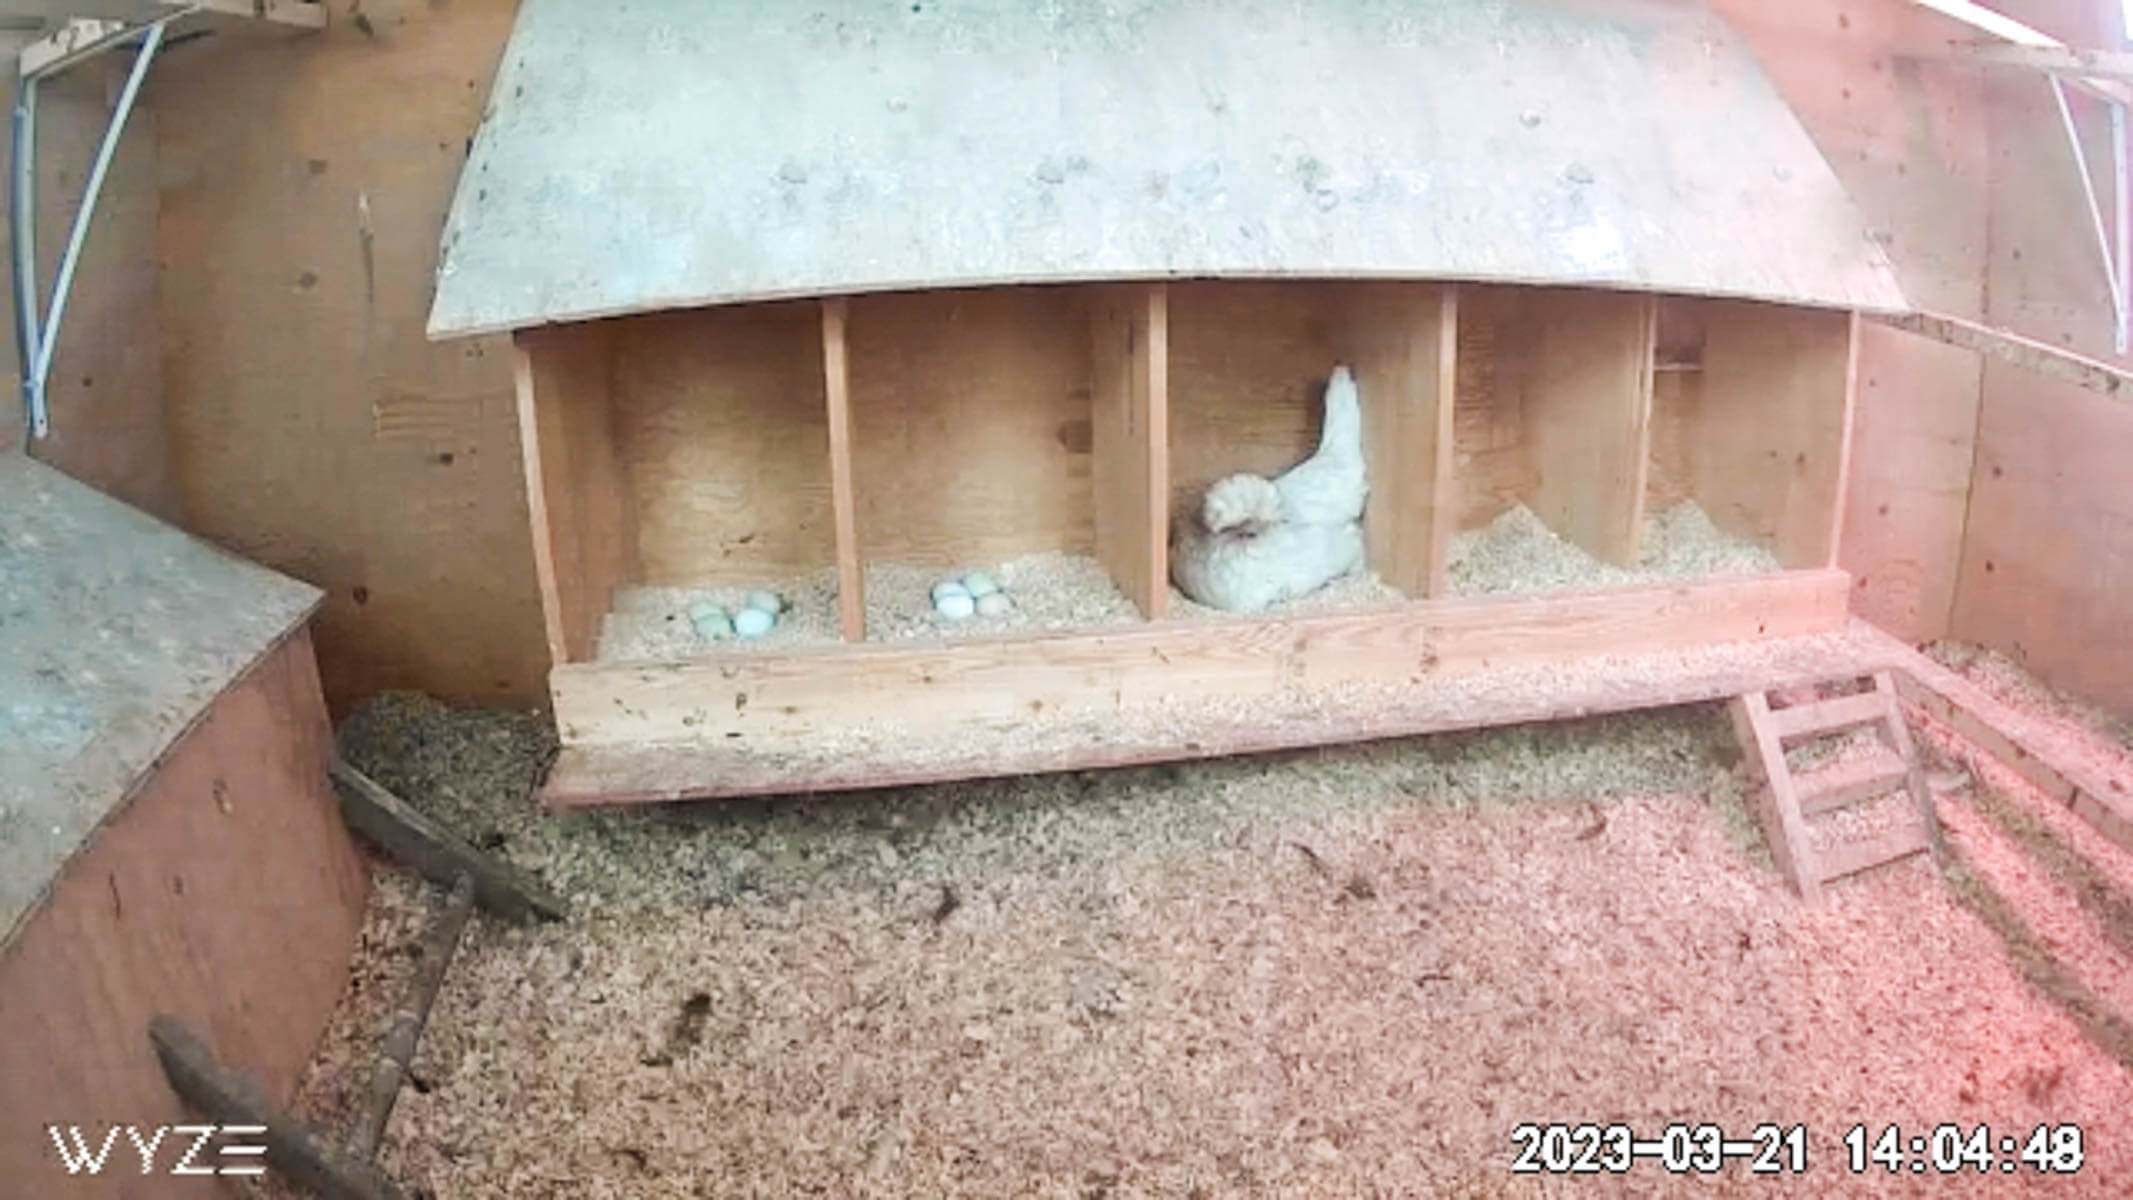
Nesting Boxes:
We currently have 5 nesting boxes for 18 hens which is a bit over the recommended 1 nesting box per 4 chickens. I don't know how much it matters, I have a couple of double-decker chickens who like to lay on top of each other, even if there are open boxes...haha
These are the boxes that came with the coop, and are quite large - 13"x 13". These boxes work great, and can comfortably hold all of my birds, even Willow who has to be 8-10 lbs.
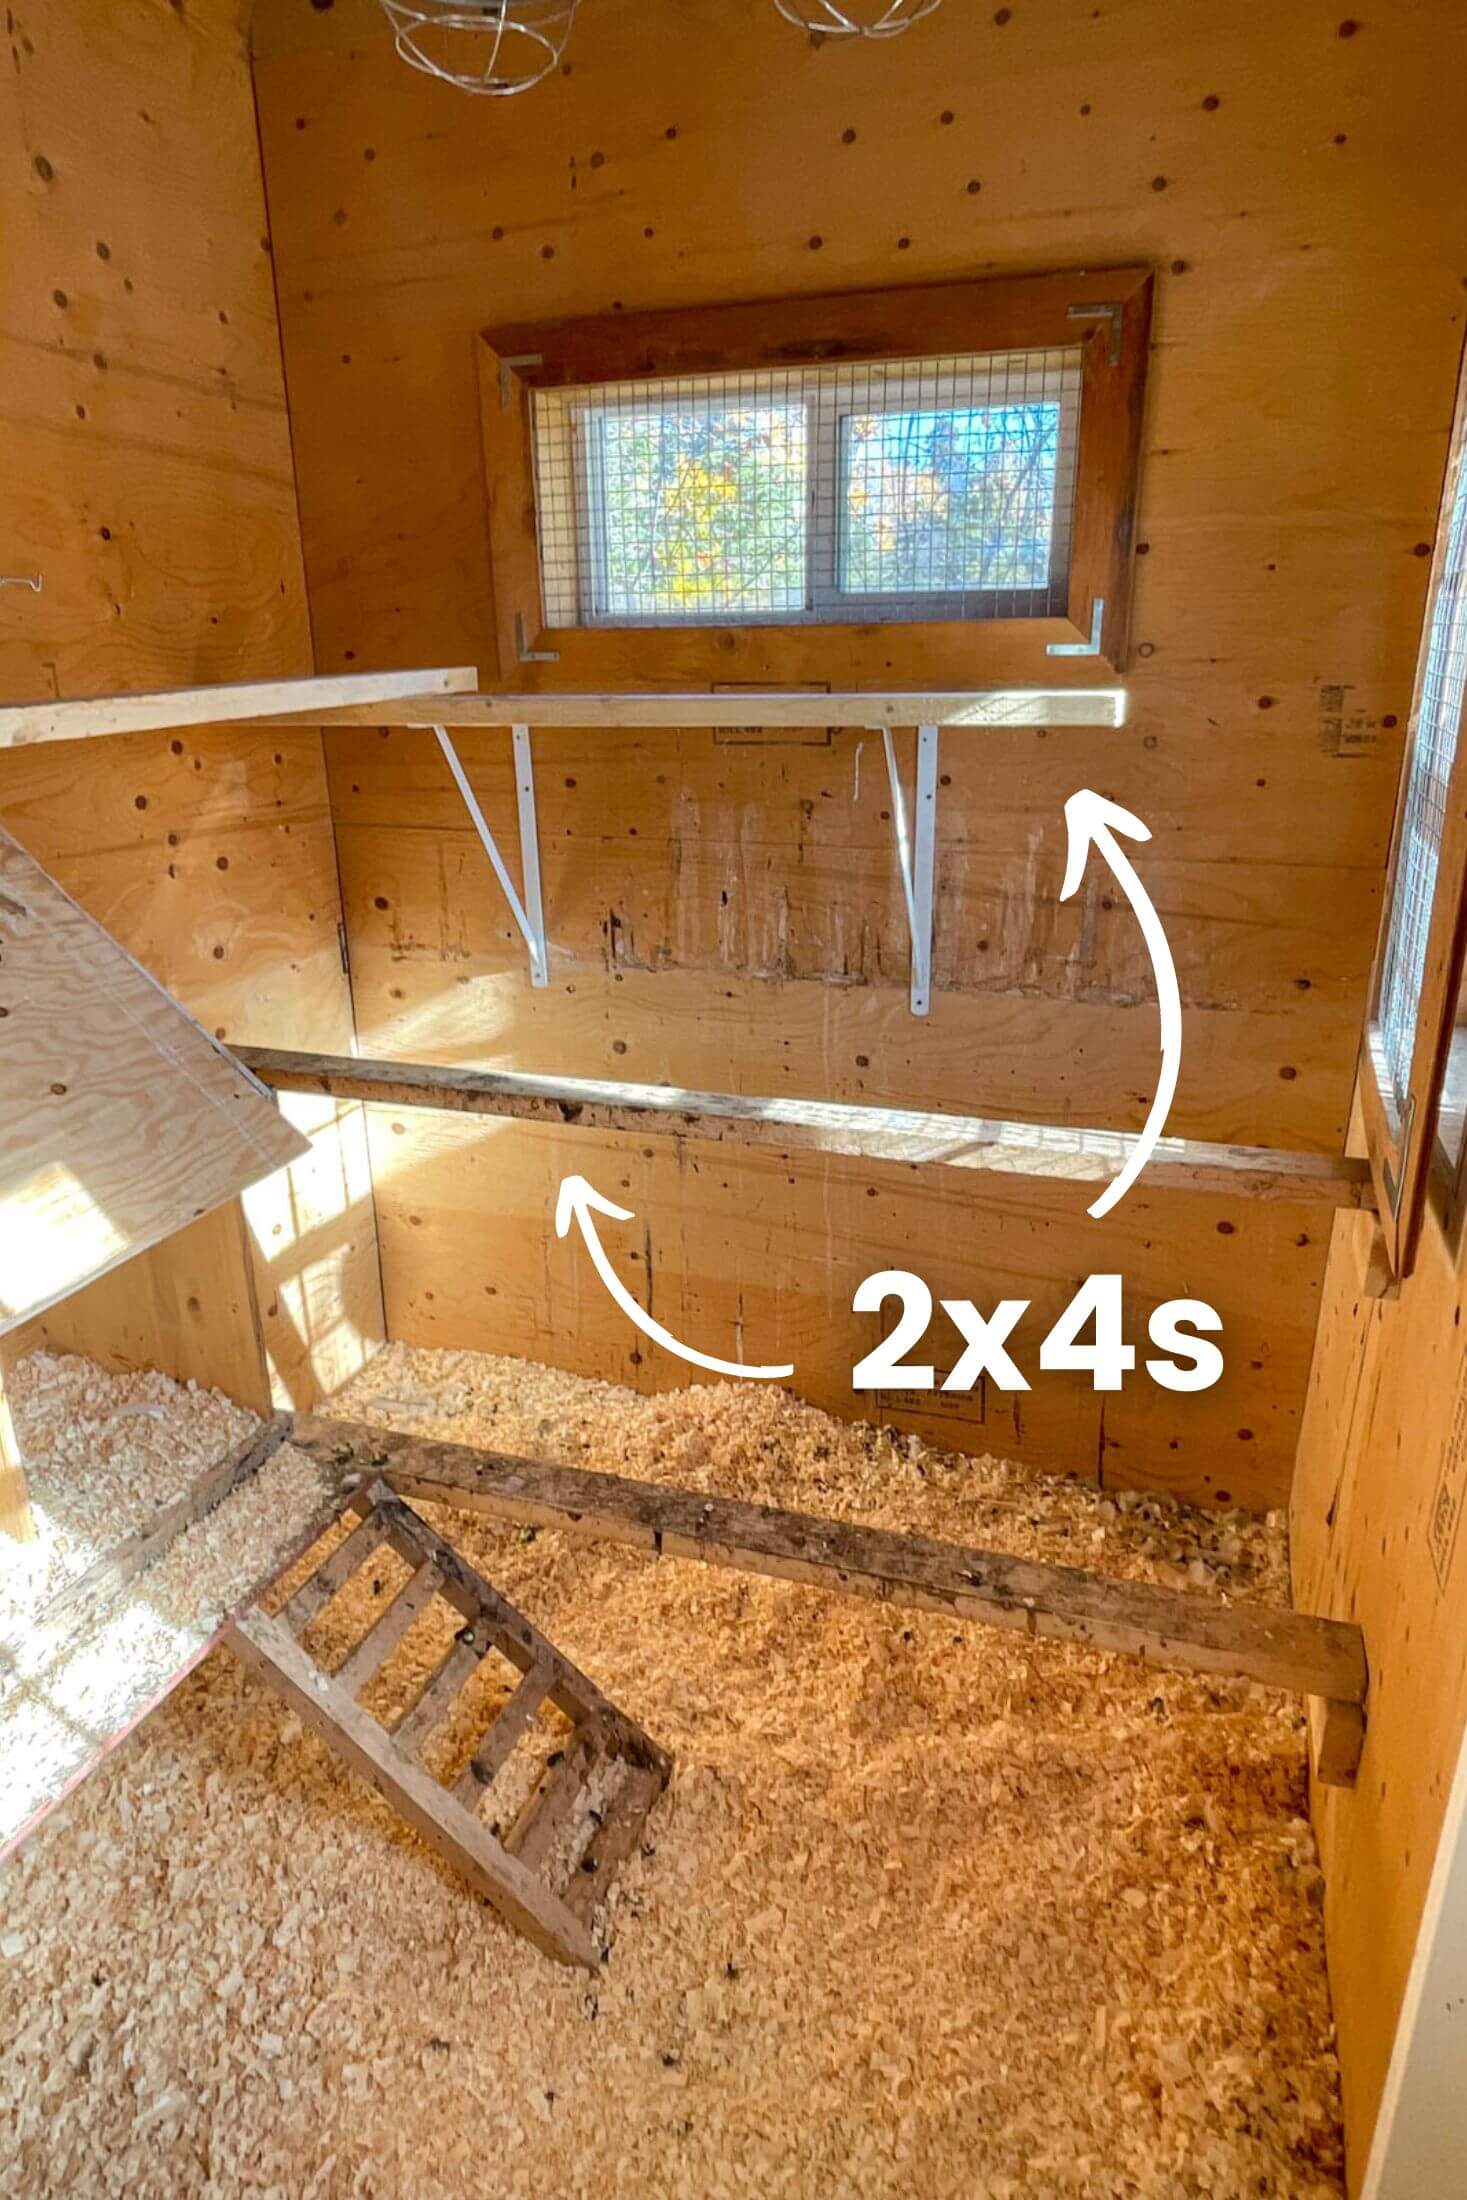
Roosting Bars:
All of the roosting bars in our coop are 2x4s laid flat. Due to our cold climate, we feel this is best for the birds so they are able to squat down and cover their toes with their warm bellies in the cold months.
Originally, we just had the lower two roosting bars. The lower one is hinged to allow for easy cleanouts, the middle one in the photo is fixed but doesn't interfere with cleaning.
In the fall of 2022, we added a few point of lay pullets to the flock to increase our flock size going into winter. More birds meant we had to add a few more roosting bars to accommodate all of the birds. You can see we hung those with shelf brackets and that worked great!
As we get further into chicken keeping, we adjust and try new things to see what works best for us and the birds.
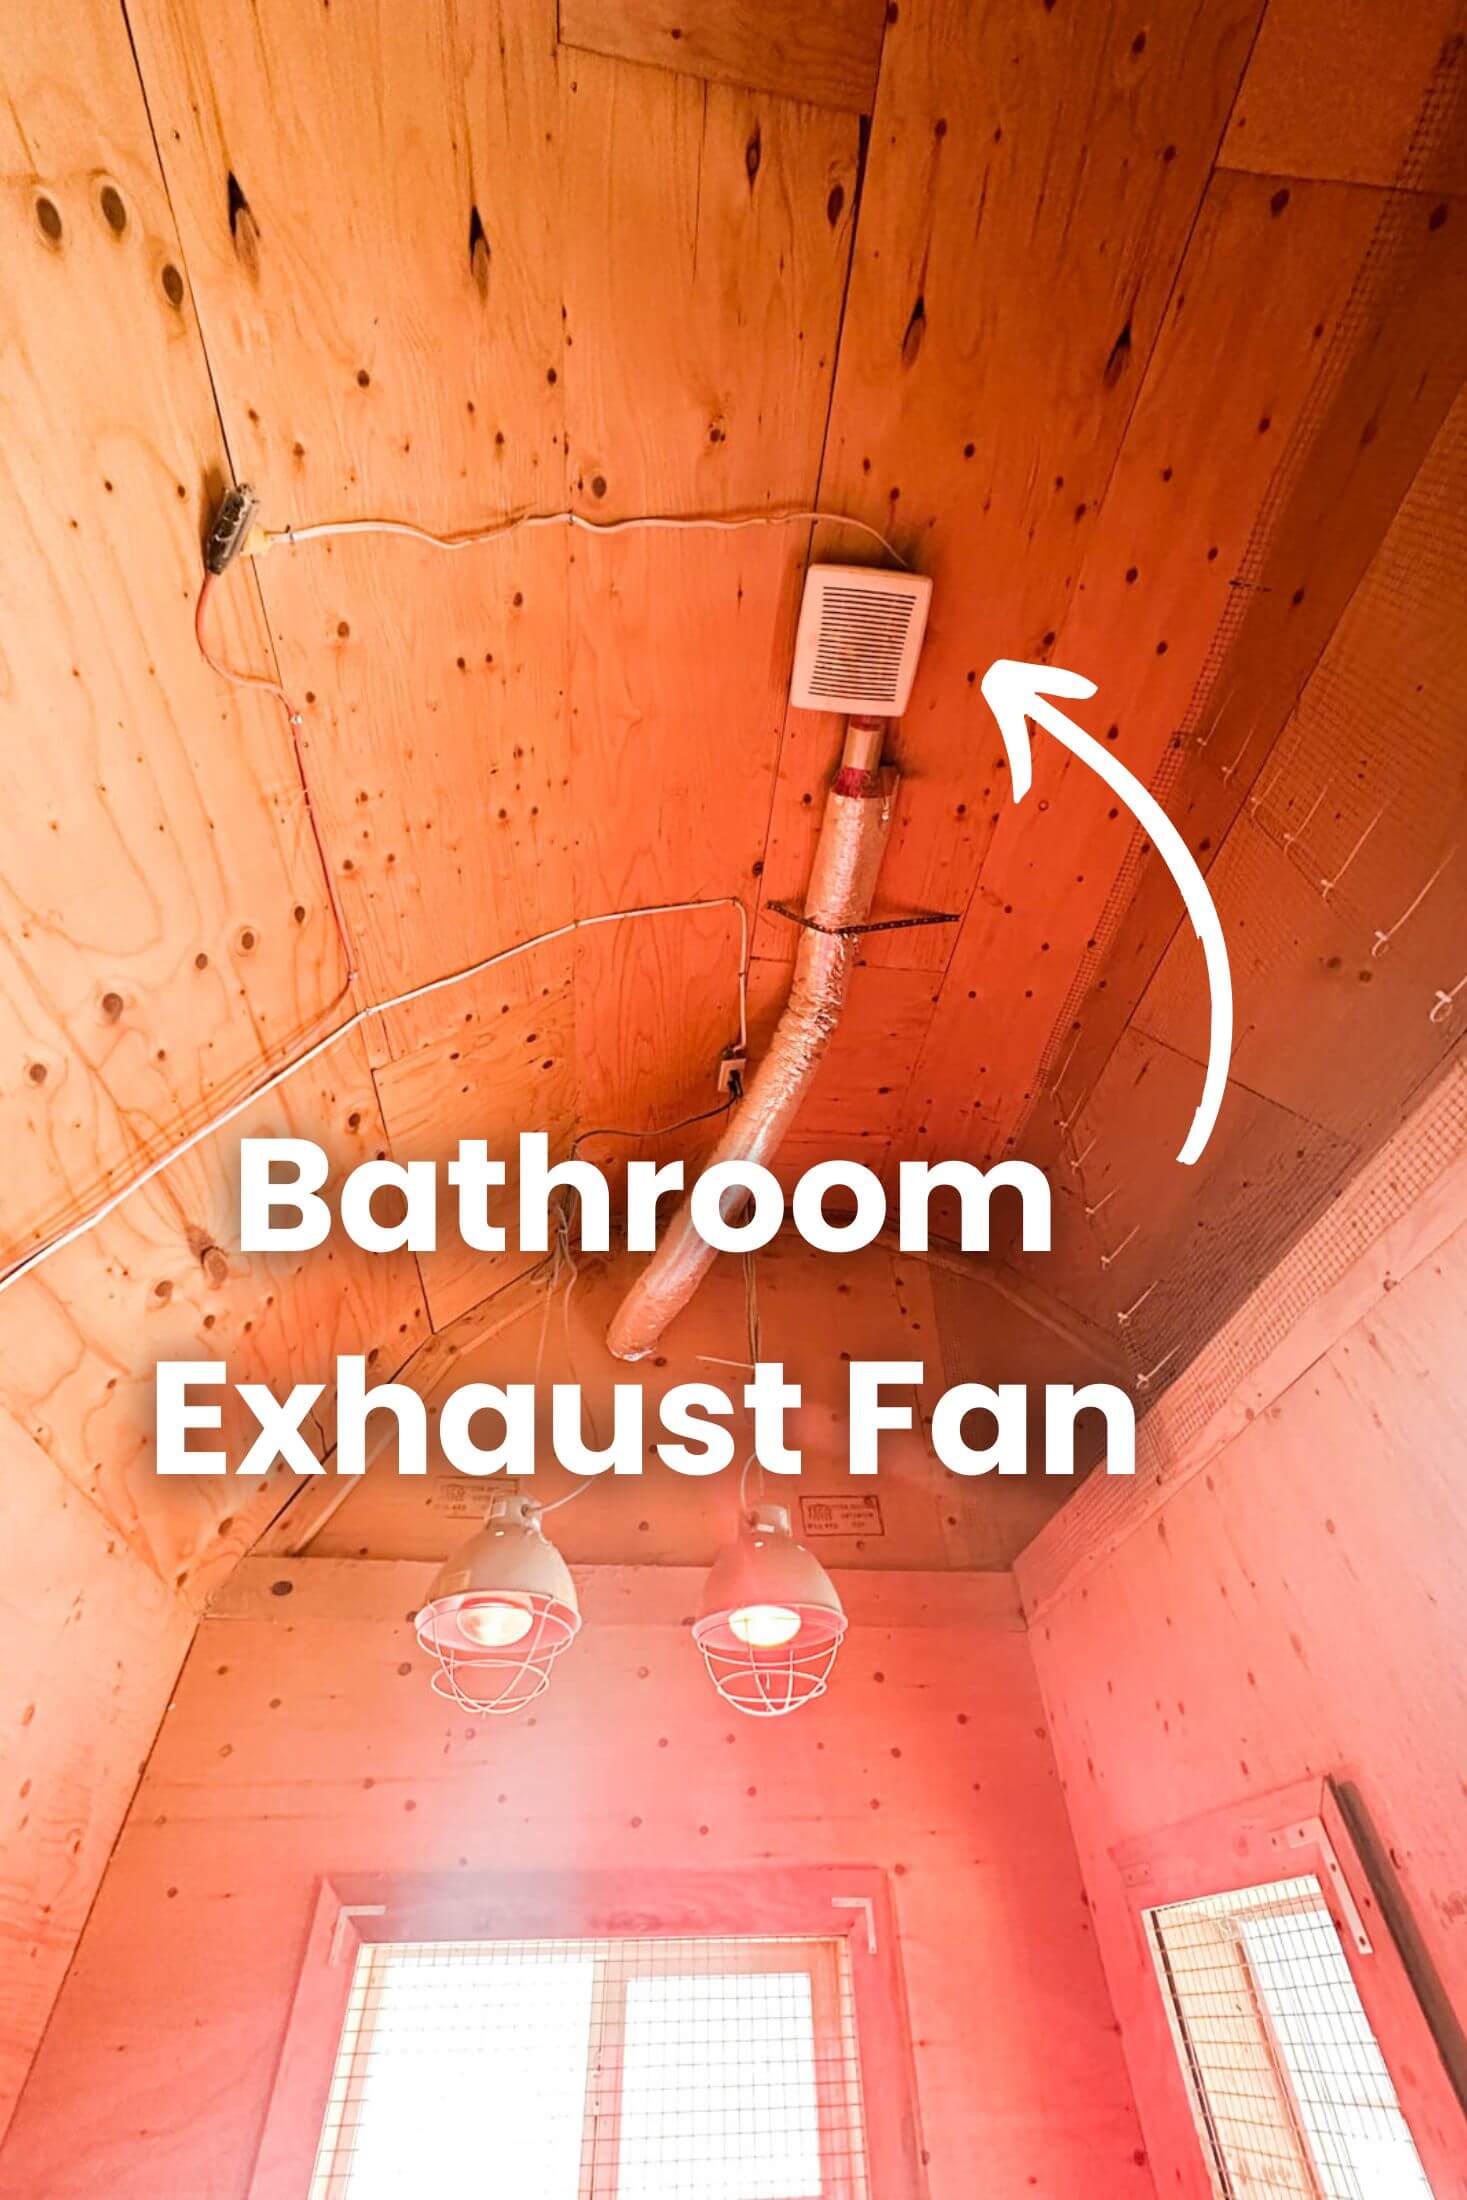
Bathroom Exhaust Fan:
Our coop is fully insulated, and while that's great for keeping in heat, it also cuts the ventilation down to almost zero.
Chickens are sensitive to moisture in the air at low temperatures - too high humidity and sub-zero temperatures can cause frostbite and respiratory issues. Unfortunately, their droppings and respiration put a lot of humidity into the air.
Chickens are also sensitive to poor air quality, which can occur in unventilated spaces.
The way we mitigate this risk is by forcefully circulating air. Our coop has a bathroom exhaust fan located at the high point on the ceiling and during the cold months, I have it set on a timer to run 15 minutes every hour.
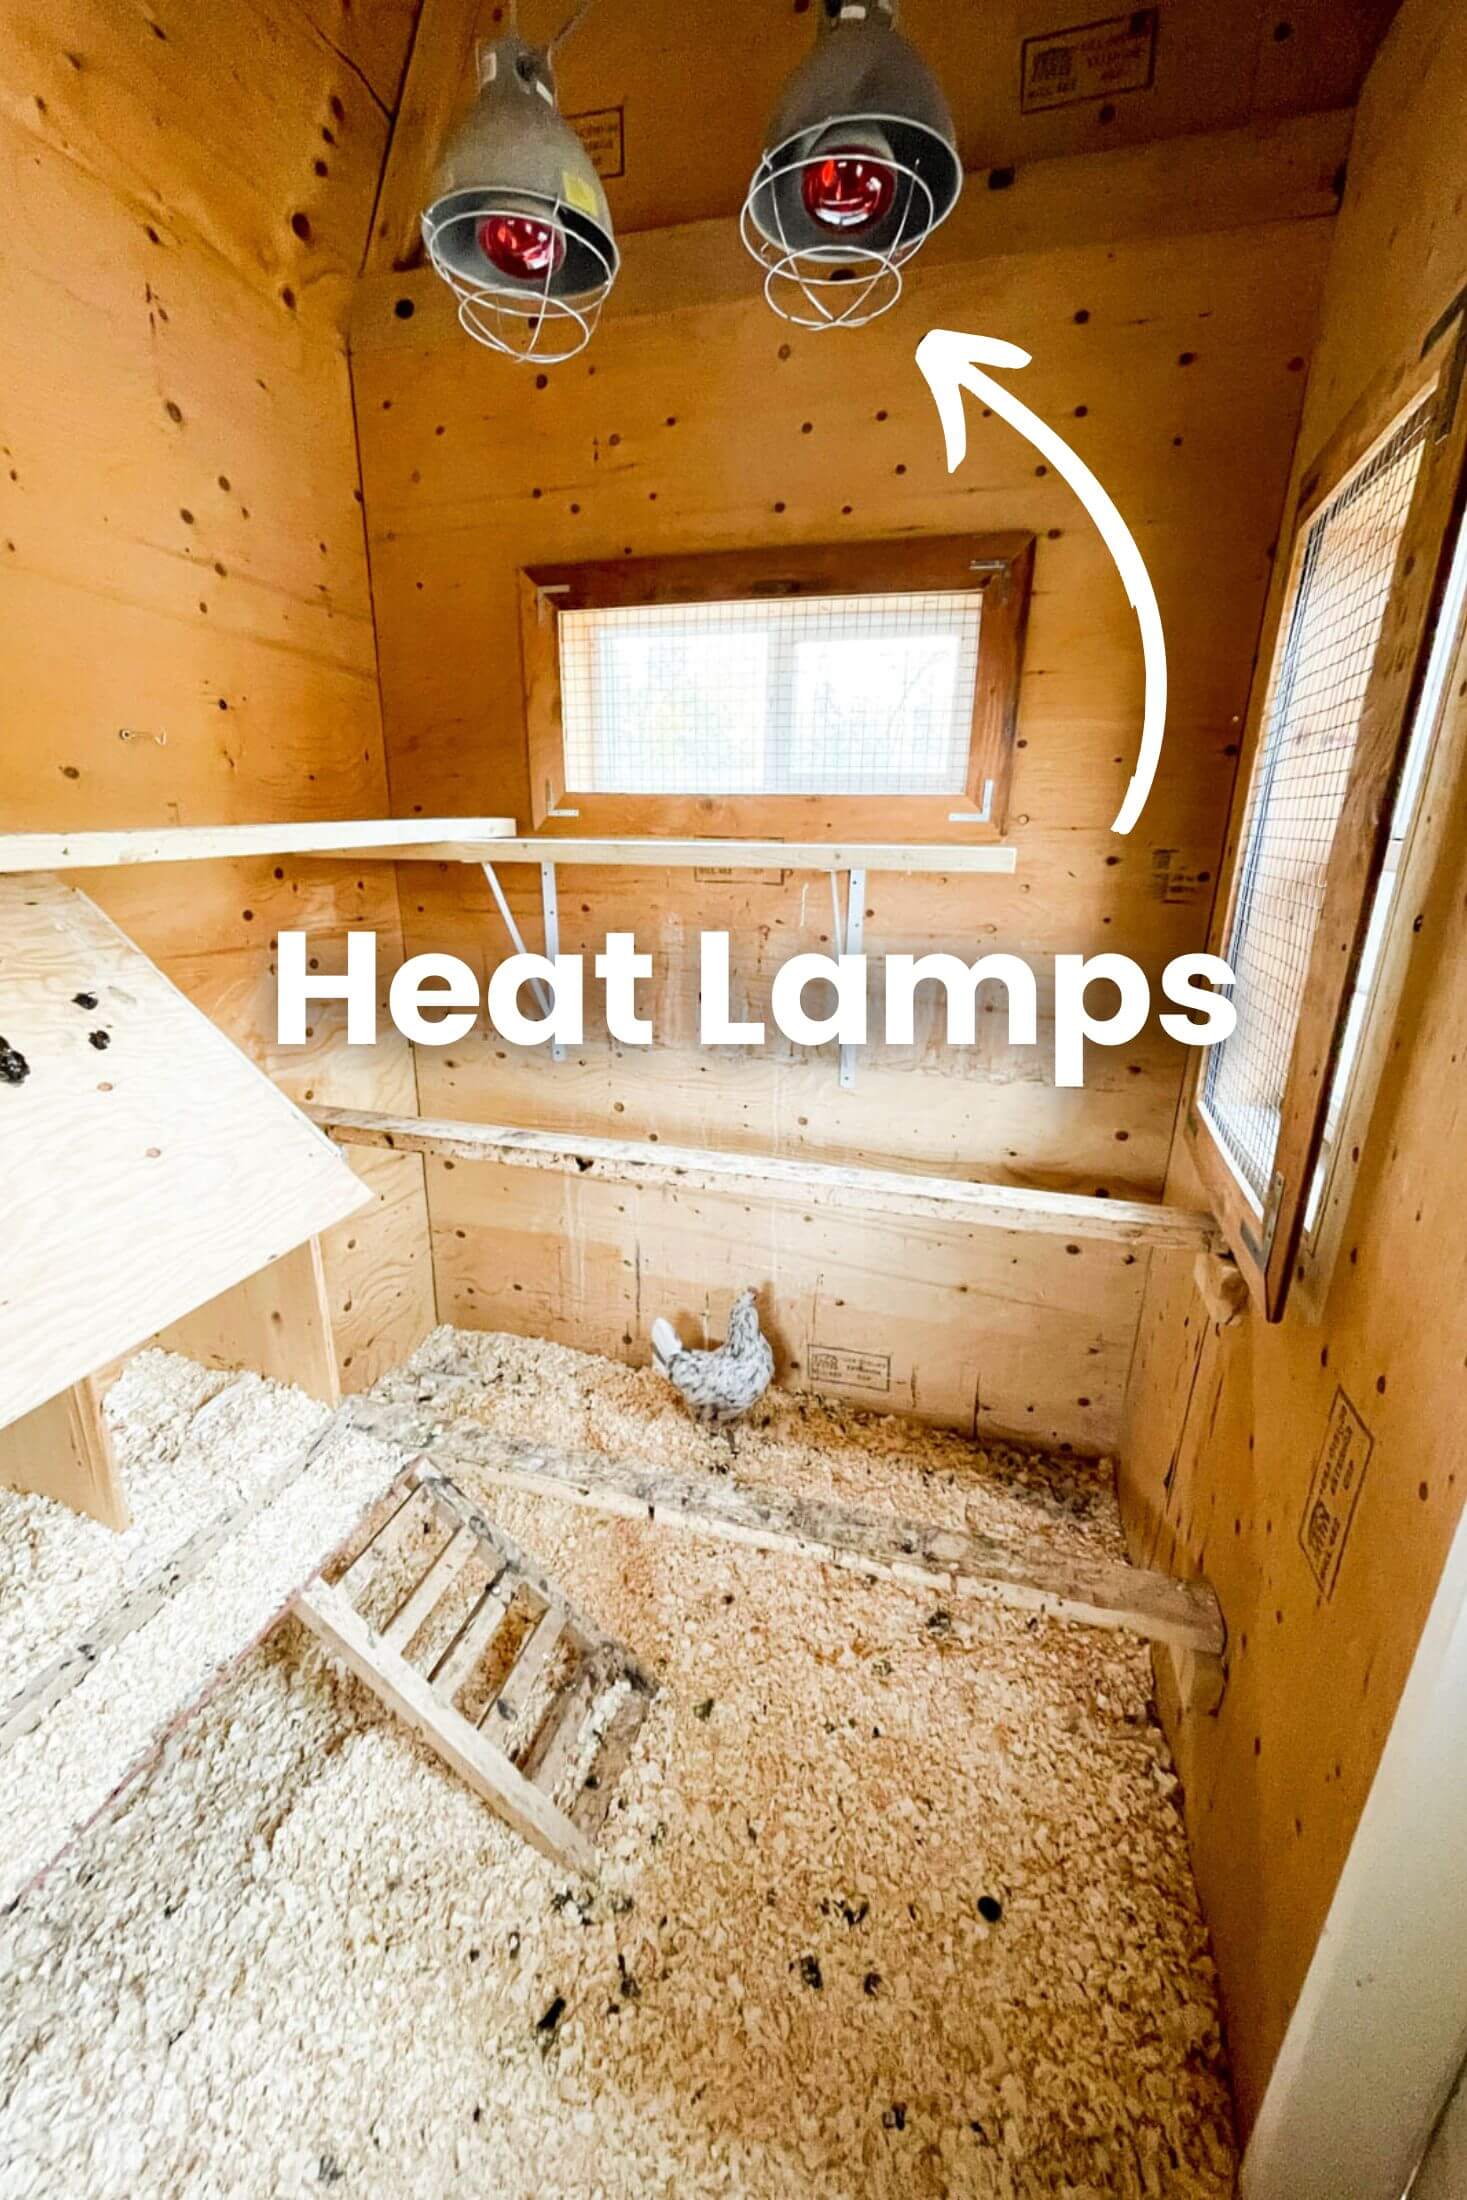
Heat Lamps:
This one is really controversial!
I will say that heat lamps aren't for everyone, but they can make a huge difference in your flock's health and happiness through the winter months, especially if you live in a place with harsh winters like ours.
In fact, we tried our hardest to avoid using heat lamps, but when we hit a prolonged cold snap with lows of -40 to -45c, we felt it was in the best interest of our flock to add heat to the coop.
They responded within a week, we went from them laying 0 eggs to laying 14-15 eggs a day from only 18 hens!
We ensured that these lamps were secure and I went so far as to clarify that the set-up was acceptable to my insurance company before we even used them!
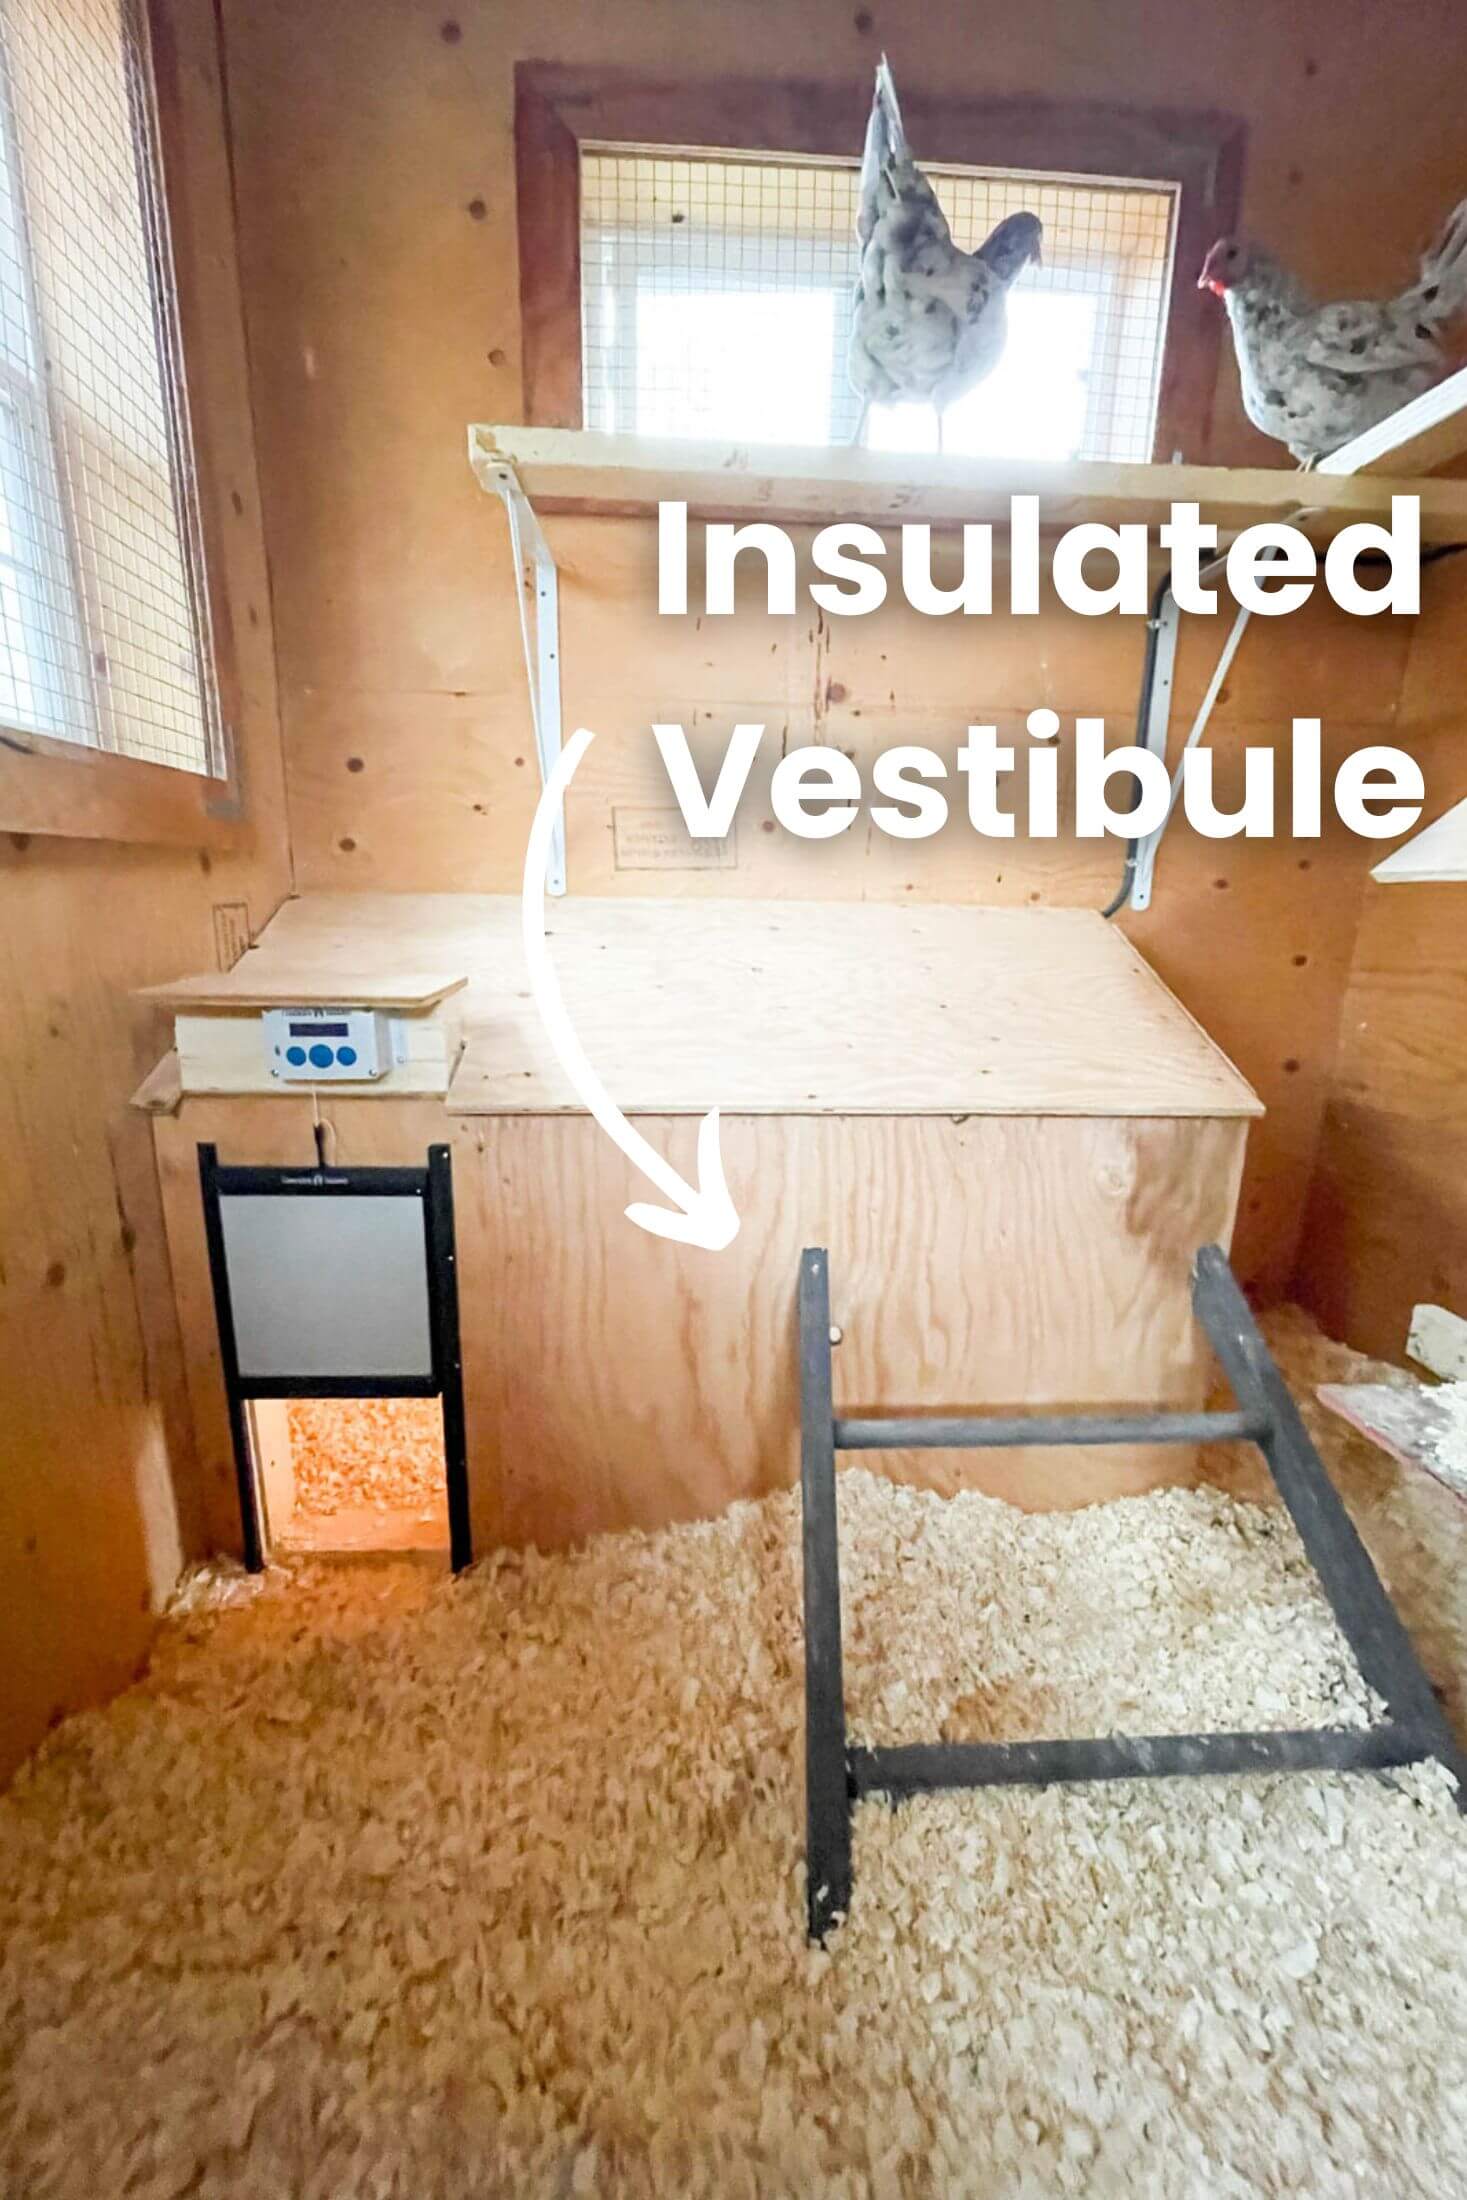
Insulated Vestibule:
We intentionally placed the coop facing south to capture any solar energy it could during the cold months. By orienting the windows and the door to the south, we ensured that they would capture the most sunlight while the sun is low in the winter skies.
But, that presented a problem. The opening to the chicken run faced west, which meant the prevailing west winds were free to blow straight into the coop.
Our solution to frigid winter air blowing directly into the coop was to build an insulated vestibule. And it works fantastic. Kevin placed an angled sheet of plywood on top of the vestibule as a poop shield, which also works really well.
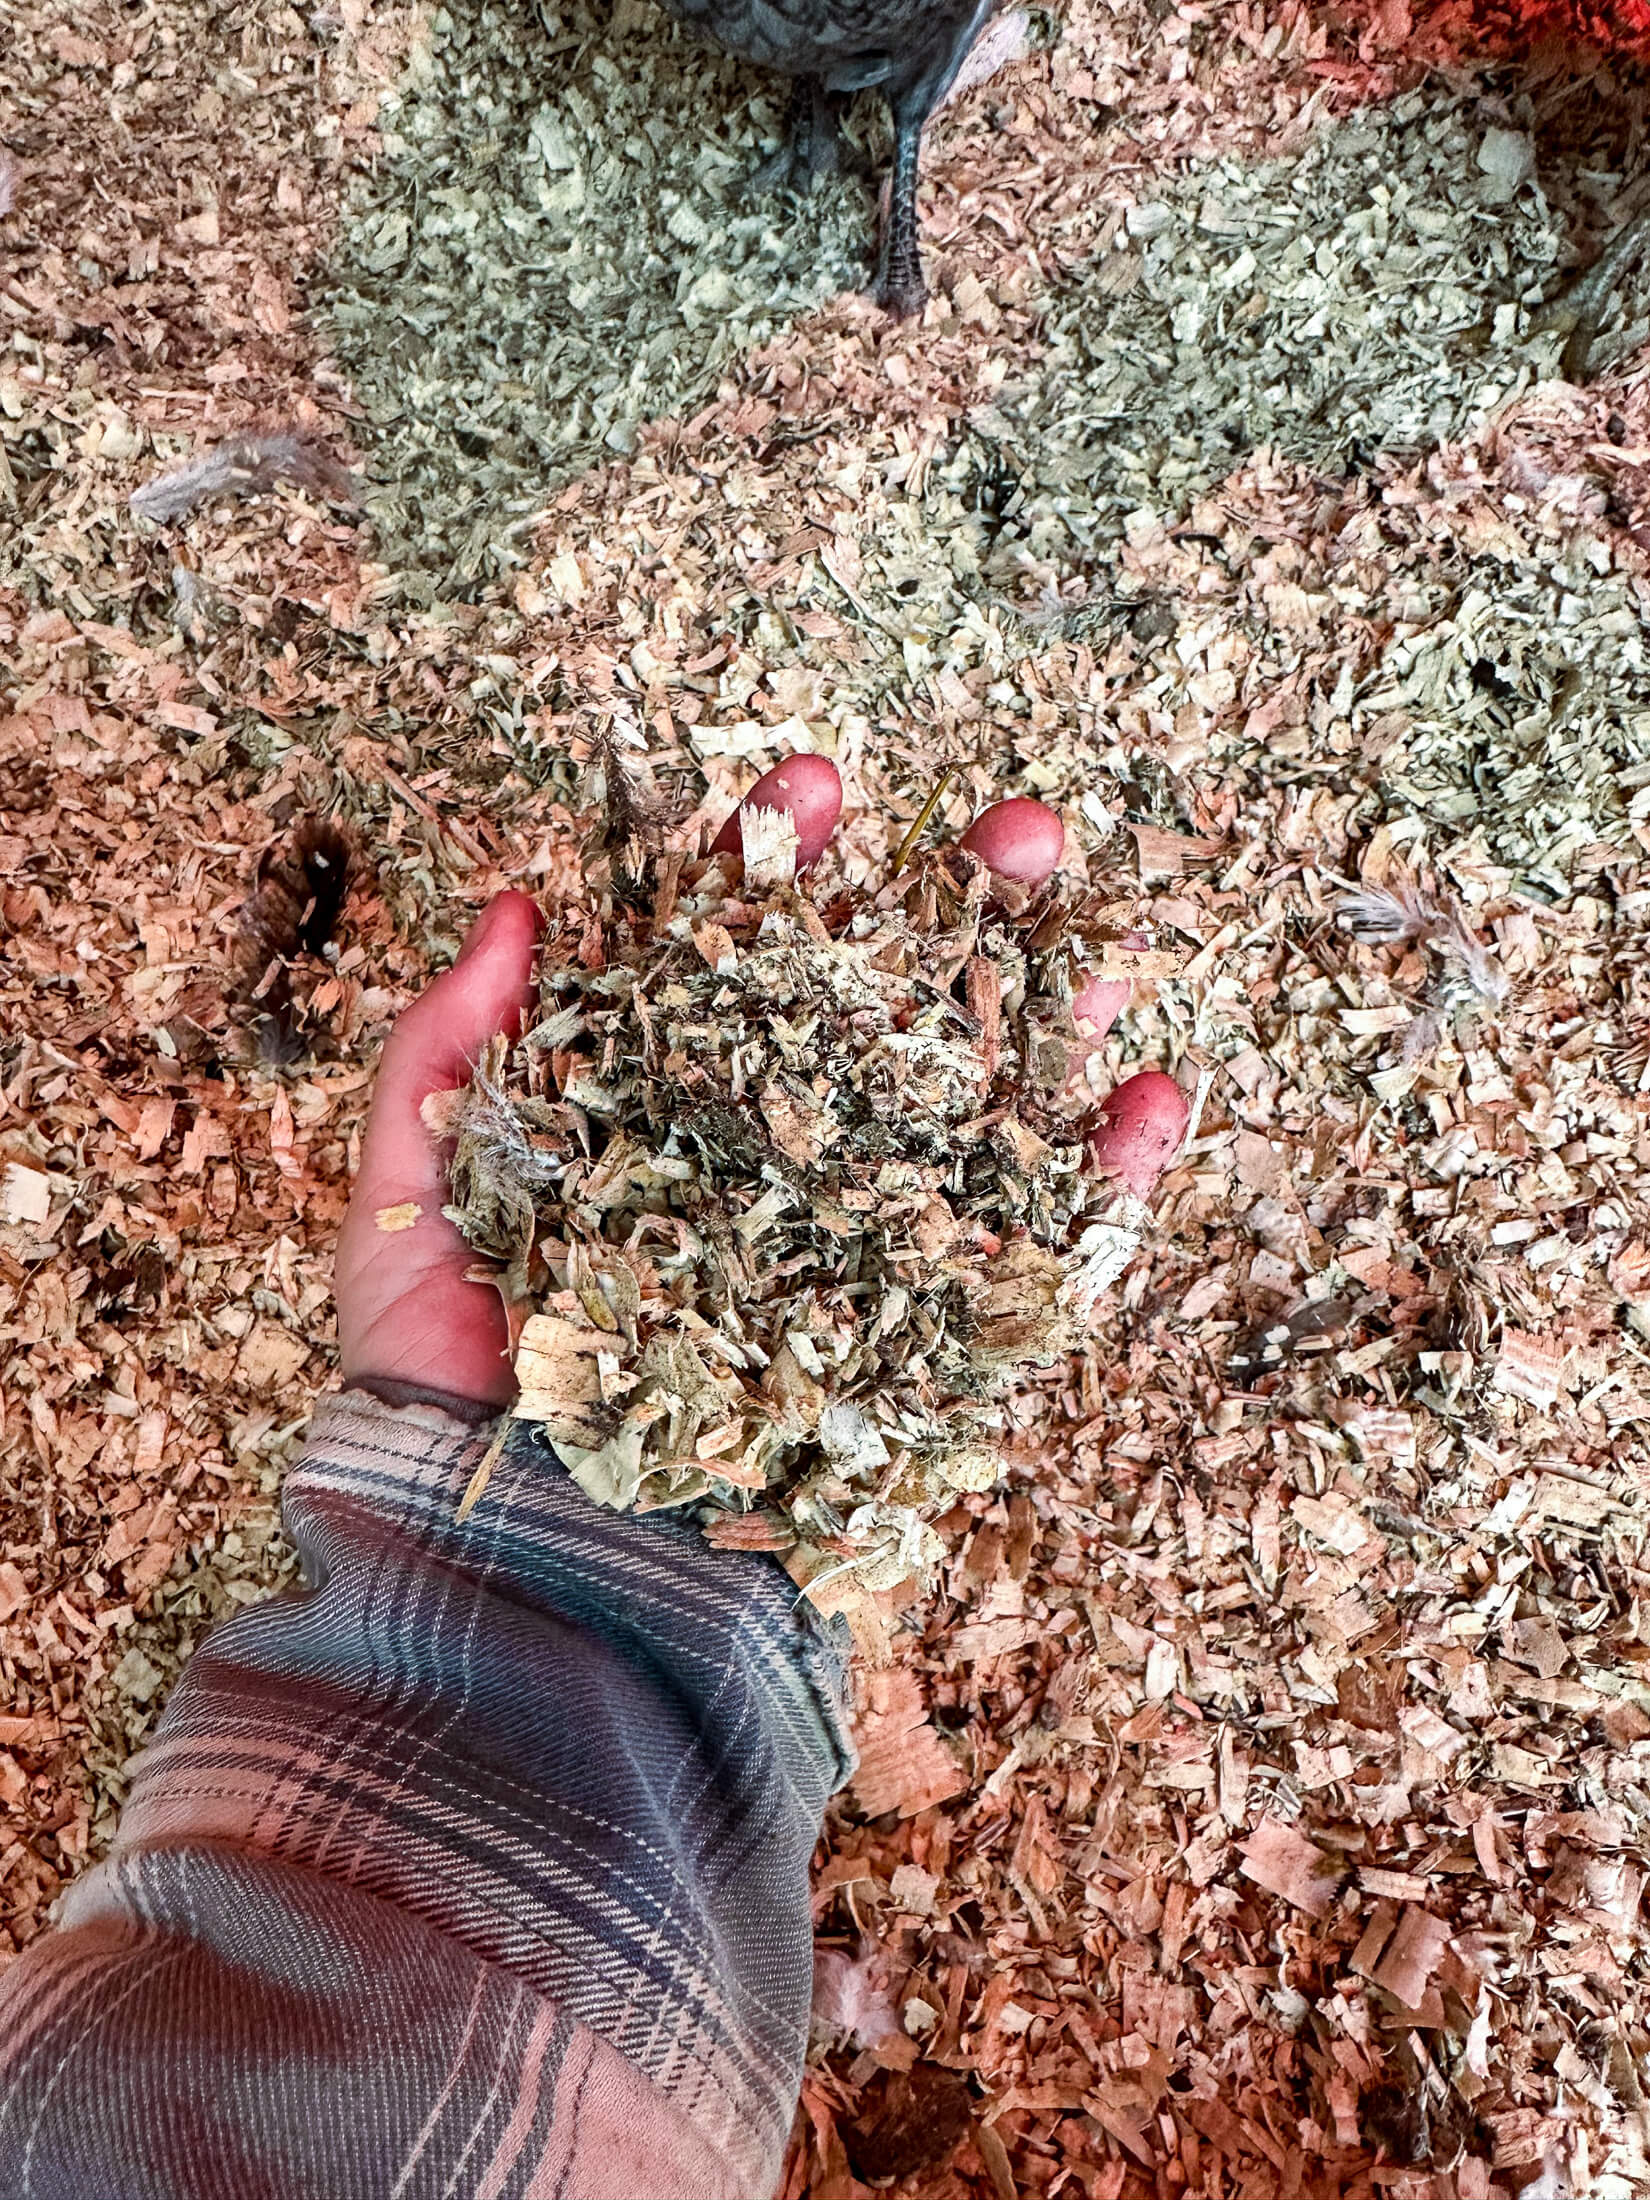
Deep Litter Bedding:
Deep litter bedding in the chicken coop is a method of providing comfortable bedding for the chickens, typically made from organic materials including straw, wood shavings, or other natural materials.
The deep litter bedding is regularly topped up and chicken waste will build up creating a deep layer that breaks down into compost.
This helps keep the coop warmer in winter due to the heat created during the decomposition process. Deep litter also reduces manual inputs when it comes to cleaning the coop - reducing coop cleanings to 1-2 times a year!
It also magically reduces odors from chicken droppings as they decompose more quickly. Don't ask me how, it seems counter-intuitive, but it's amazing!
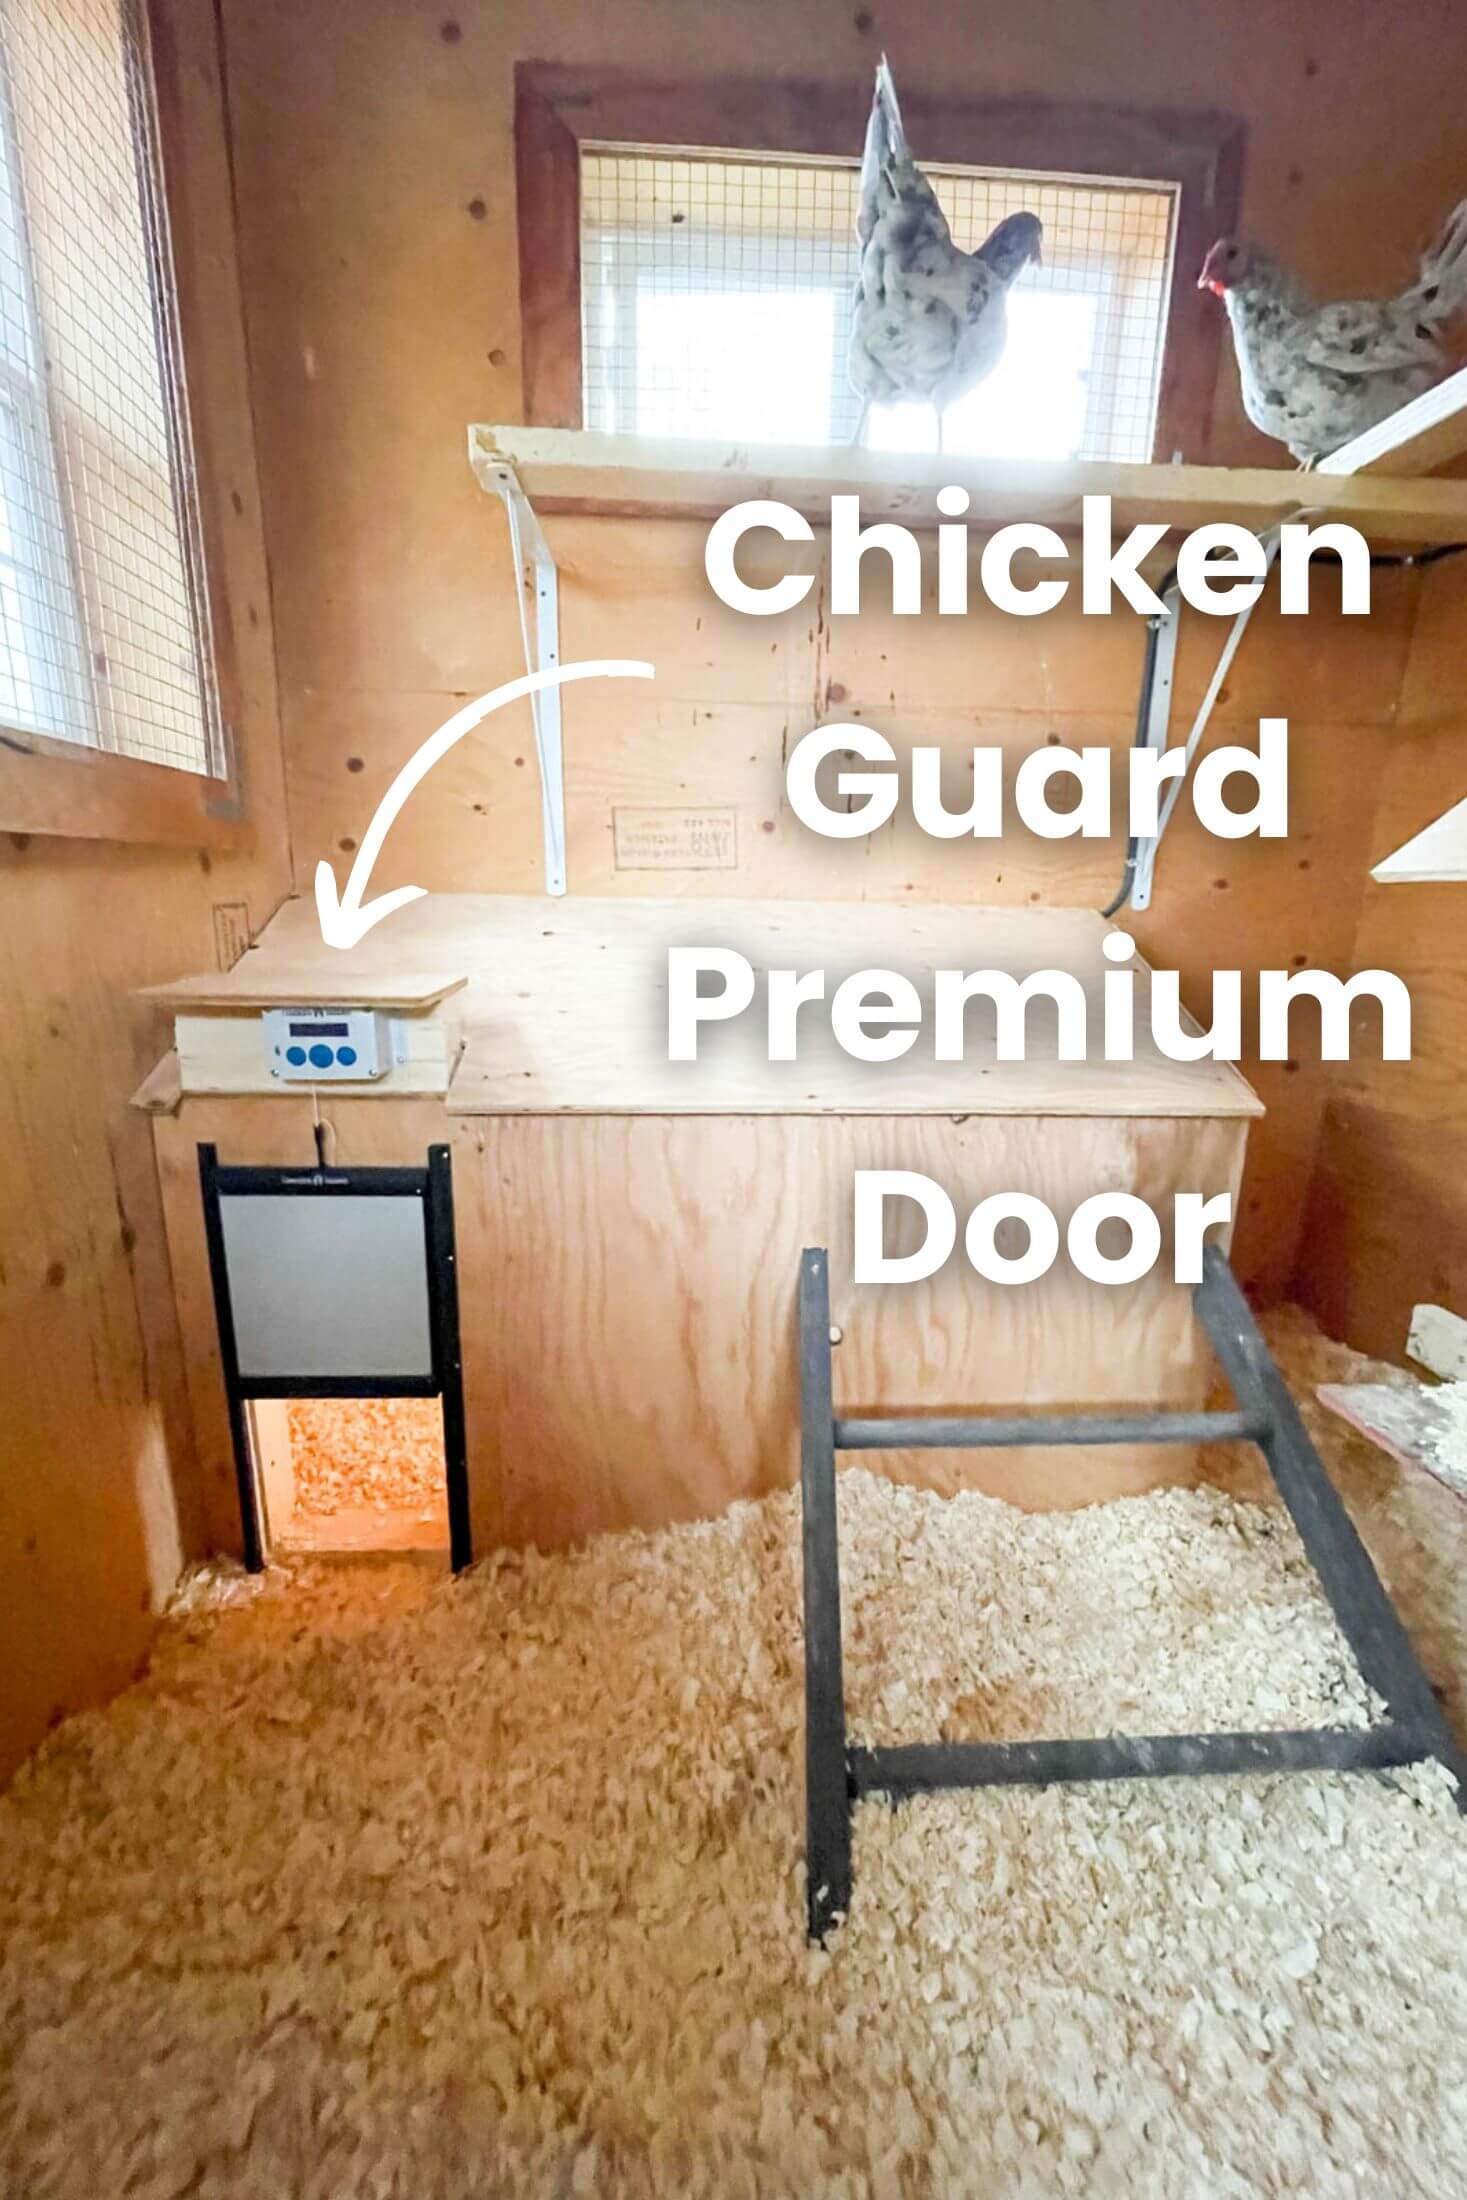
Automatic Chicken Door:
We love our chicken door. Hands down, one of the best things we've added to the coop. After a ton of research, I settled on the Chicken Guard Premium and the Door Kit, and I have loved it!
We installed our chicken door on the inside of the coop - this is an off-label install, as Chicken Guard recommends installing it on the outside of the coop. Installing the door inside the coop has meant that we haven't been able to use the lux sensor, but the timer function works just fine.
We did this for a couple of reasons:
- I wanted to protect it from the elements. The climate here in northern Alberta is harsh. Keeping it under the roof will protect it from premature weathering.
- I hoped that the batteries would last longer inside the coop, due to temperature differences. -40 is very hard on batteries!
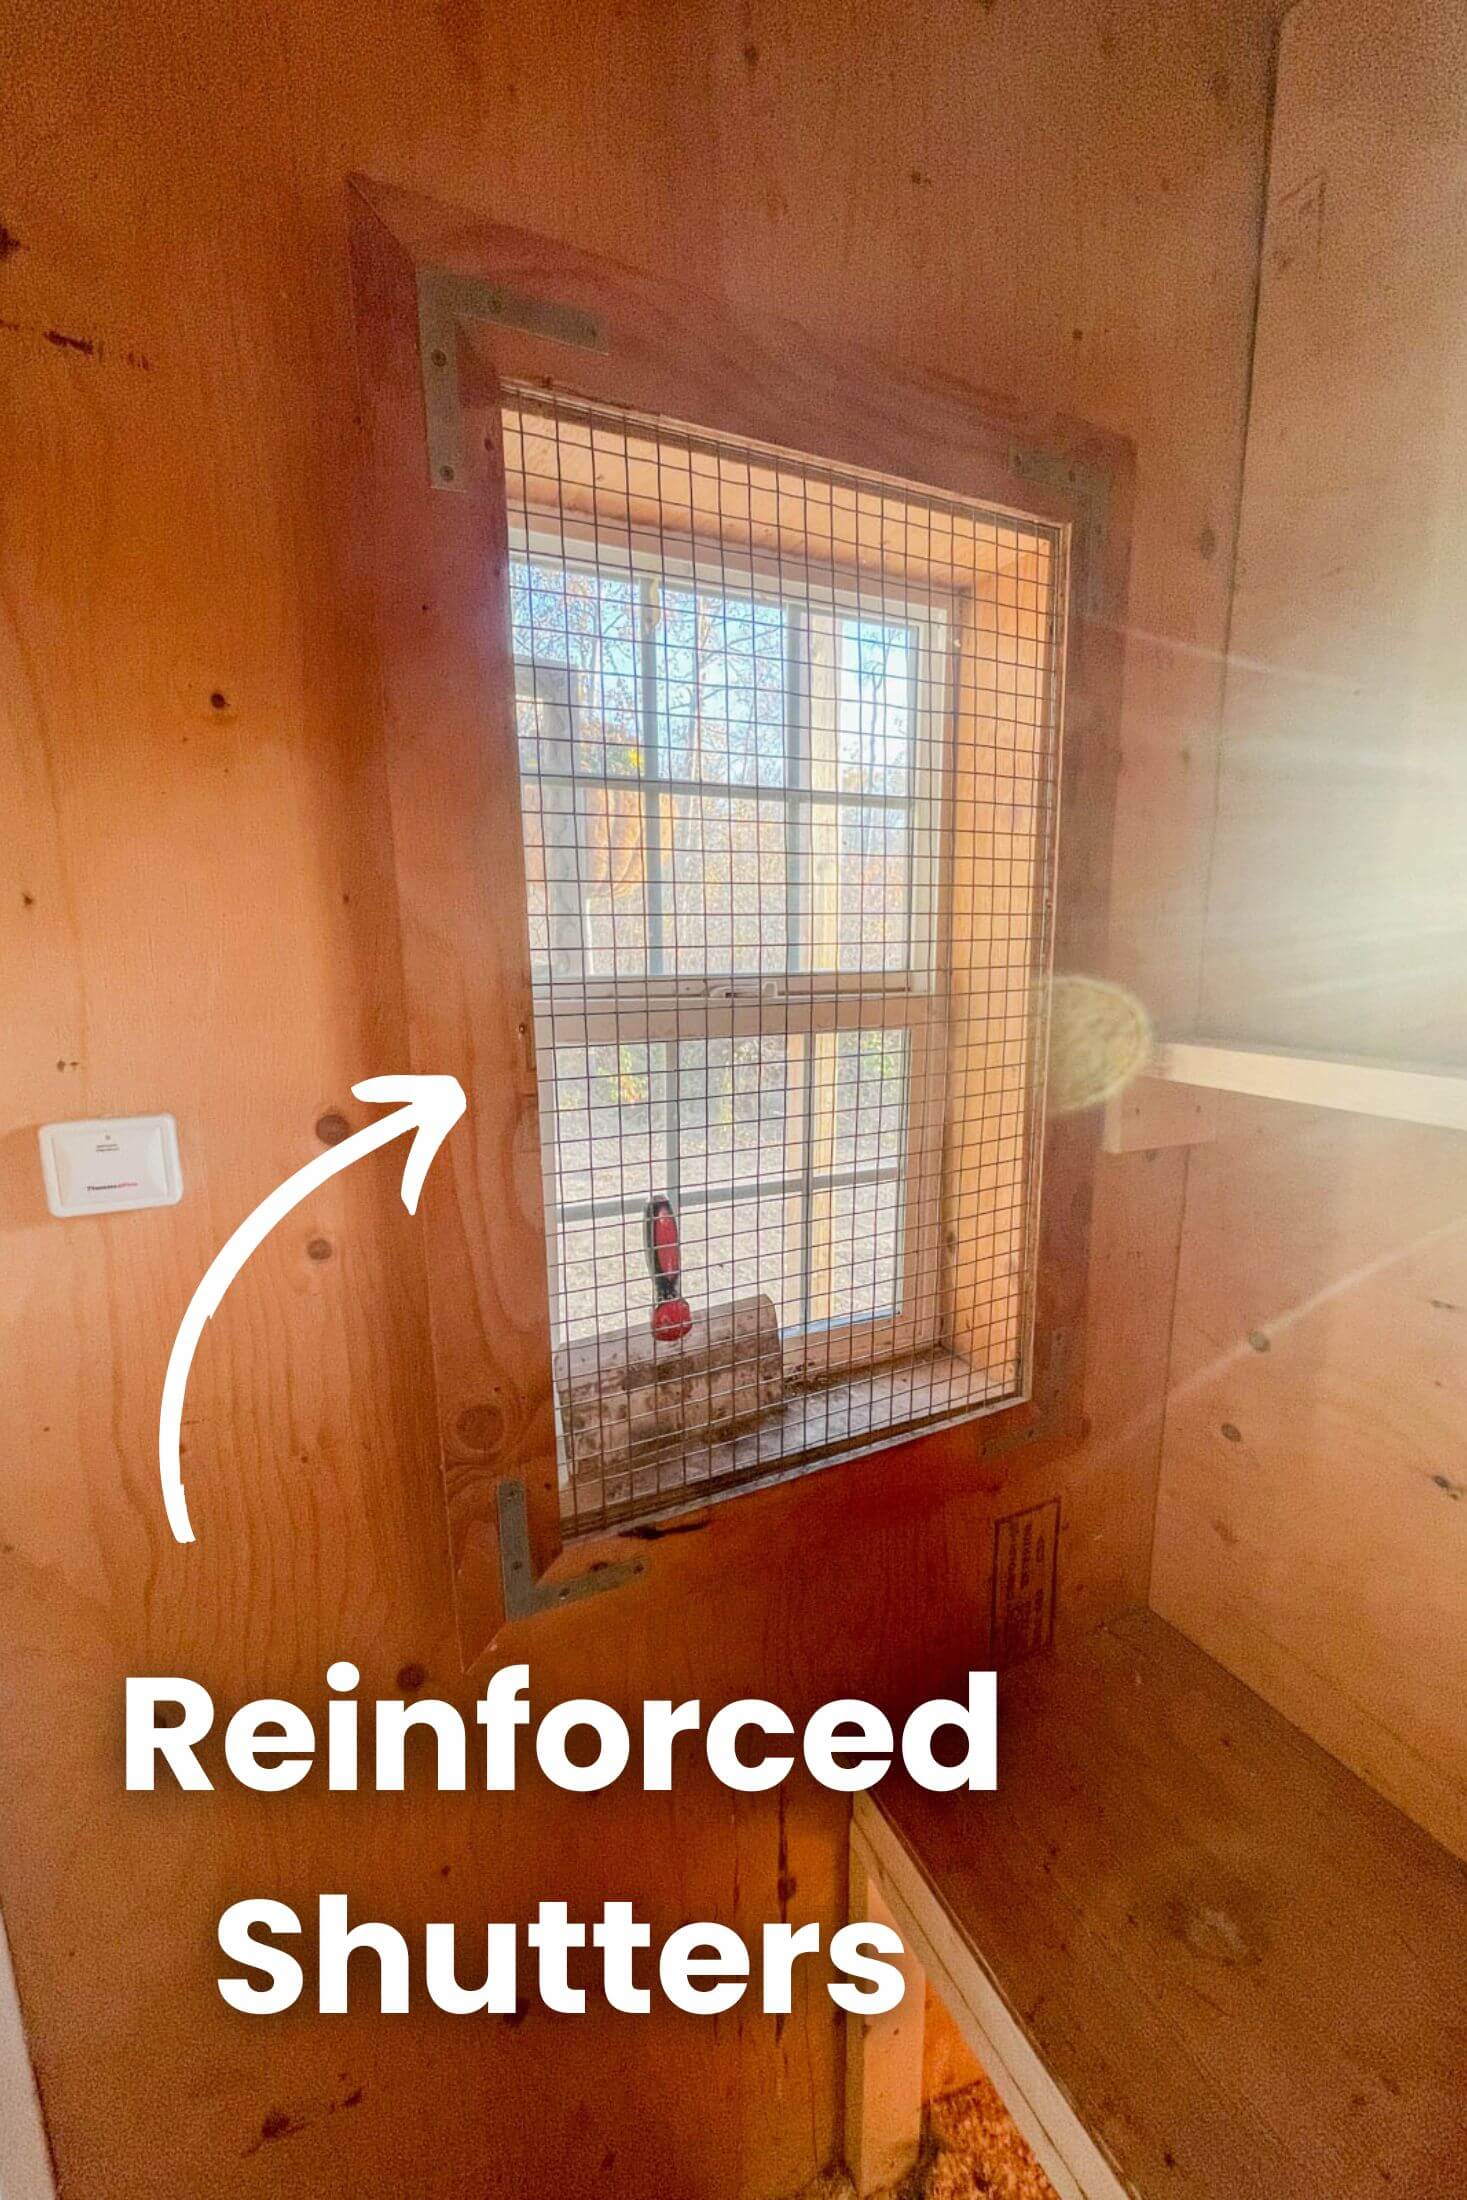
Window Shutters:
We used the window trim to create shutters for the windows. Partly because the birds loved to sleep on the window sills, and partly to add another layer of protection.
We live in predator country and have seen bobcats, bears, fishers, weasels, lynx, and more within the past year alone (!!) we are always cautious about our chickens' safety.
In order to feel good about leaving windows open in the coop during hot spells, we needed a solution, and this was it. We fit each window frame with the same 1x1" mesh we used in the run and placed them on hinges so that we would be able to open the shutters to access the windows and latches to secure them shut.
Poop Shield:
Kevin added an angled piece of plywood on top of the nesting boxes that overhangs right over the edge to protect the nesting boxes from poop while the birds are roosting.
This makes clean-up a breeze - especially since we do deep litter bedding in the coop. All it takes to clean the coop every day or so is to run a large scraper across the two poop shields and roosting bars and scrape any poop onto the floor. This is a huge part of why our deep litter is successful and doesn't smell!

Coop Cam:
This is a total splurge, but we love being able to see what's going on in the coop without disturbing the flock. This is also how I'm able to keep an eye on the girls and see who's laying what eggs!
I struggled with finding a wireless outdoor camera that would actually connect to the house WIFI, and after a few trials, settled on the Wyze Outdoor Camera.
Sounds silly, but it's a great thing to have in the coop.
Outside The Coop
When we first started talking about chickens, I shared my desire with Kevin to have forest-raised chickens. I had visions of free-range birds pecking around in the forest right outside our backyard.
Unfortunately, we have serious predator pressure here.
Our solution was to integrate the chicken run into the forest. If we couldn't bring them to the forest, we could bring the forest to them! Our run is 20x24' minus the portion of the coop that's in the run.
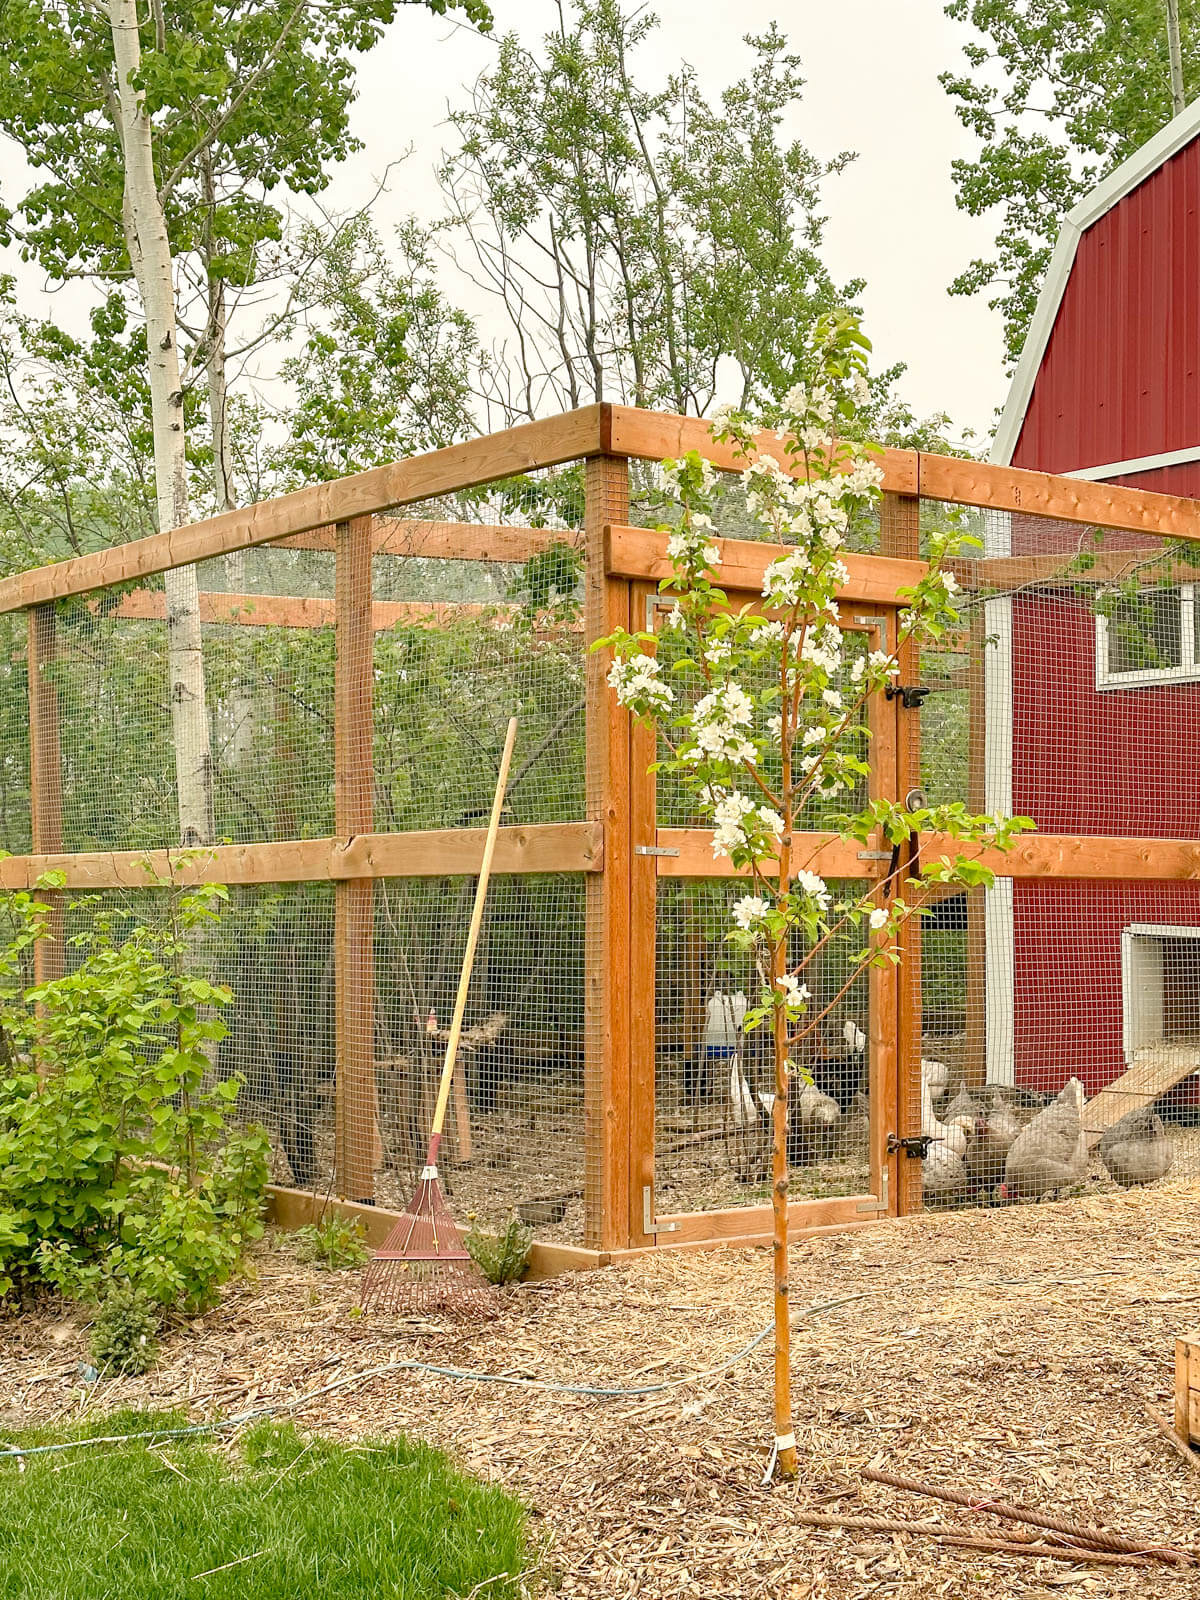
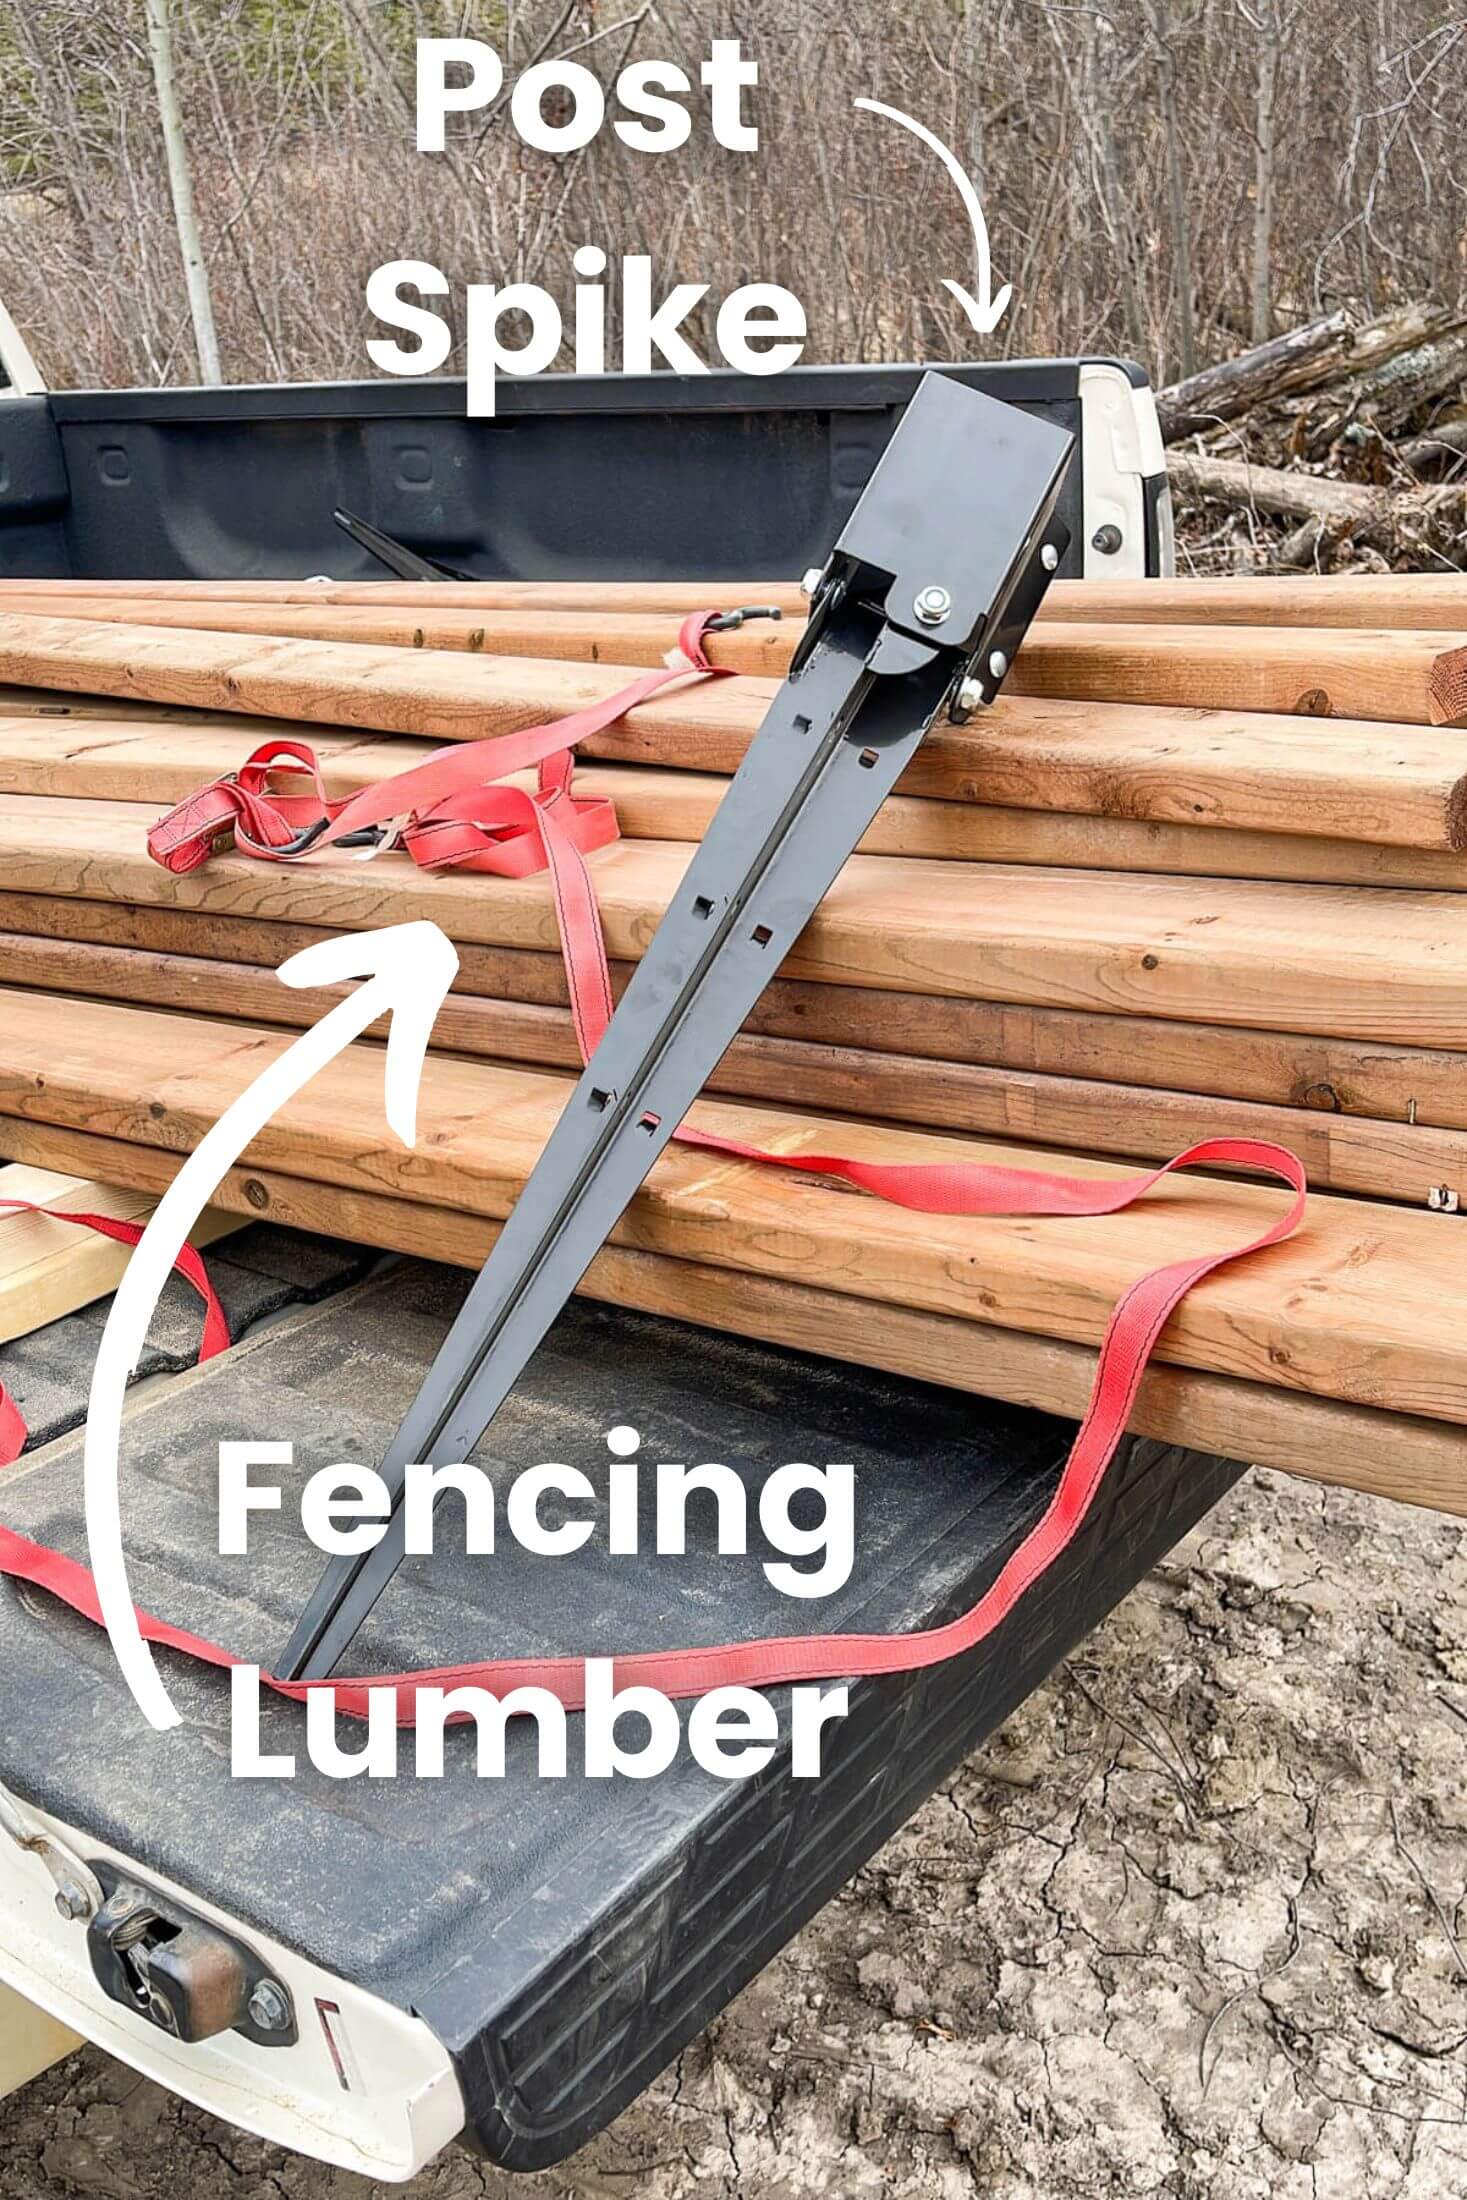
Fence Posts:
Our goal for this run was to disturb the natural forest as little as possible, as such, we decided to use pound-in post spikes rather than augering holes with the skid steer.
This decision made for a bit more physical labor, but the result was worth it. We used 4x4 posts, 8 feet long, and adjustable post spikes set at 8-foot centers.
If you choose to use this method, go for the adjustable fence post spikes, it will make your life way easier for the couple extra dollars it costs.
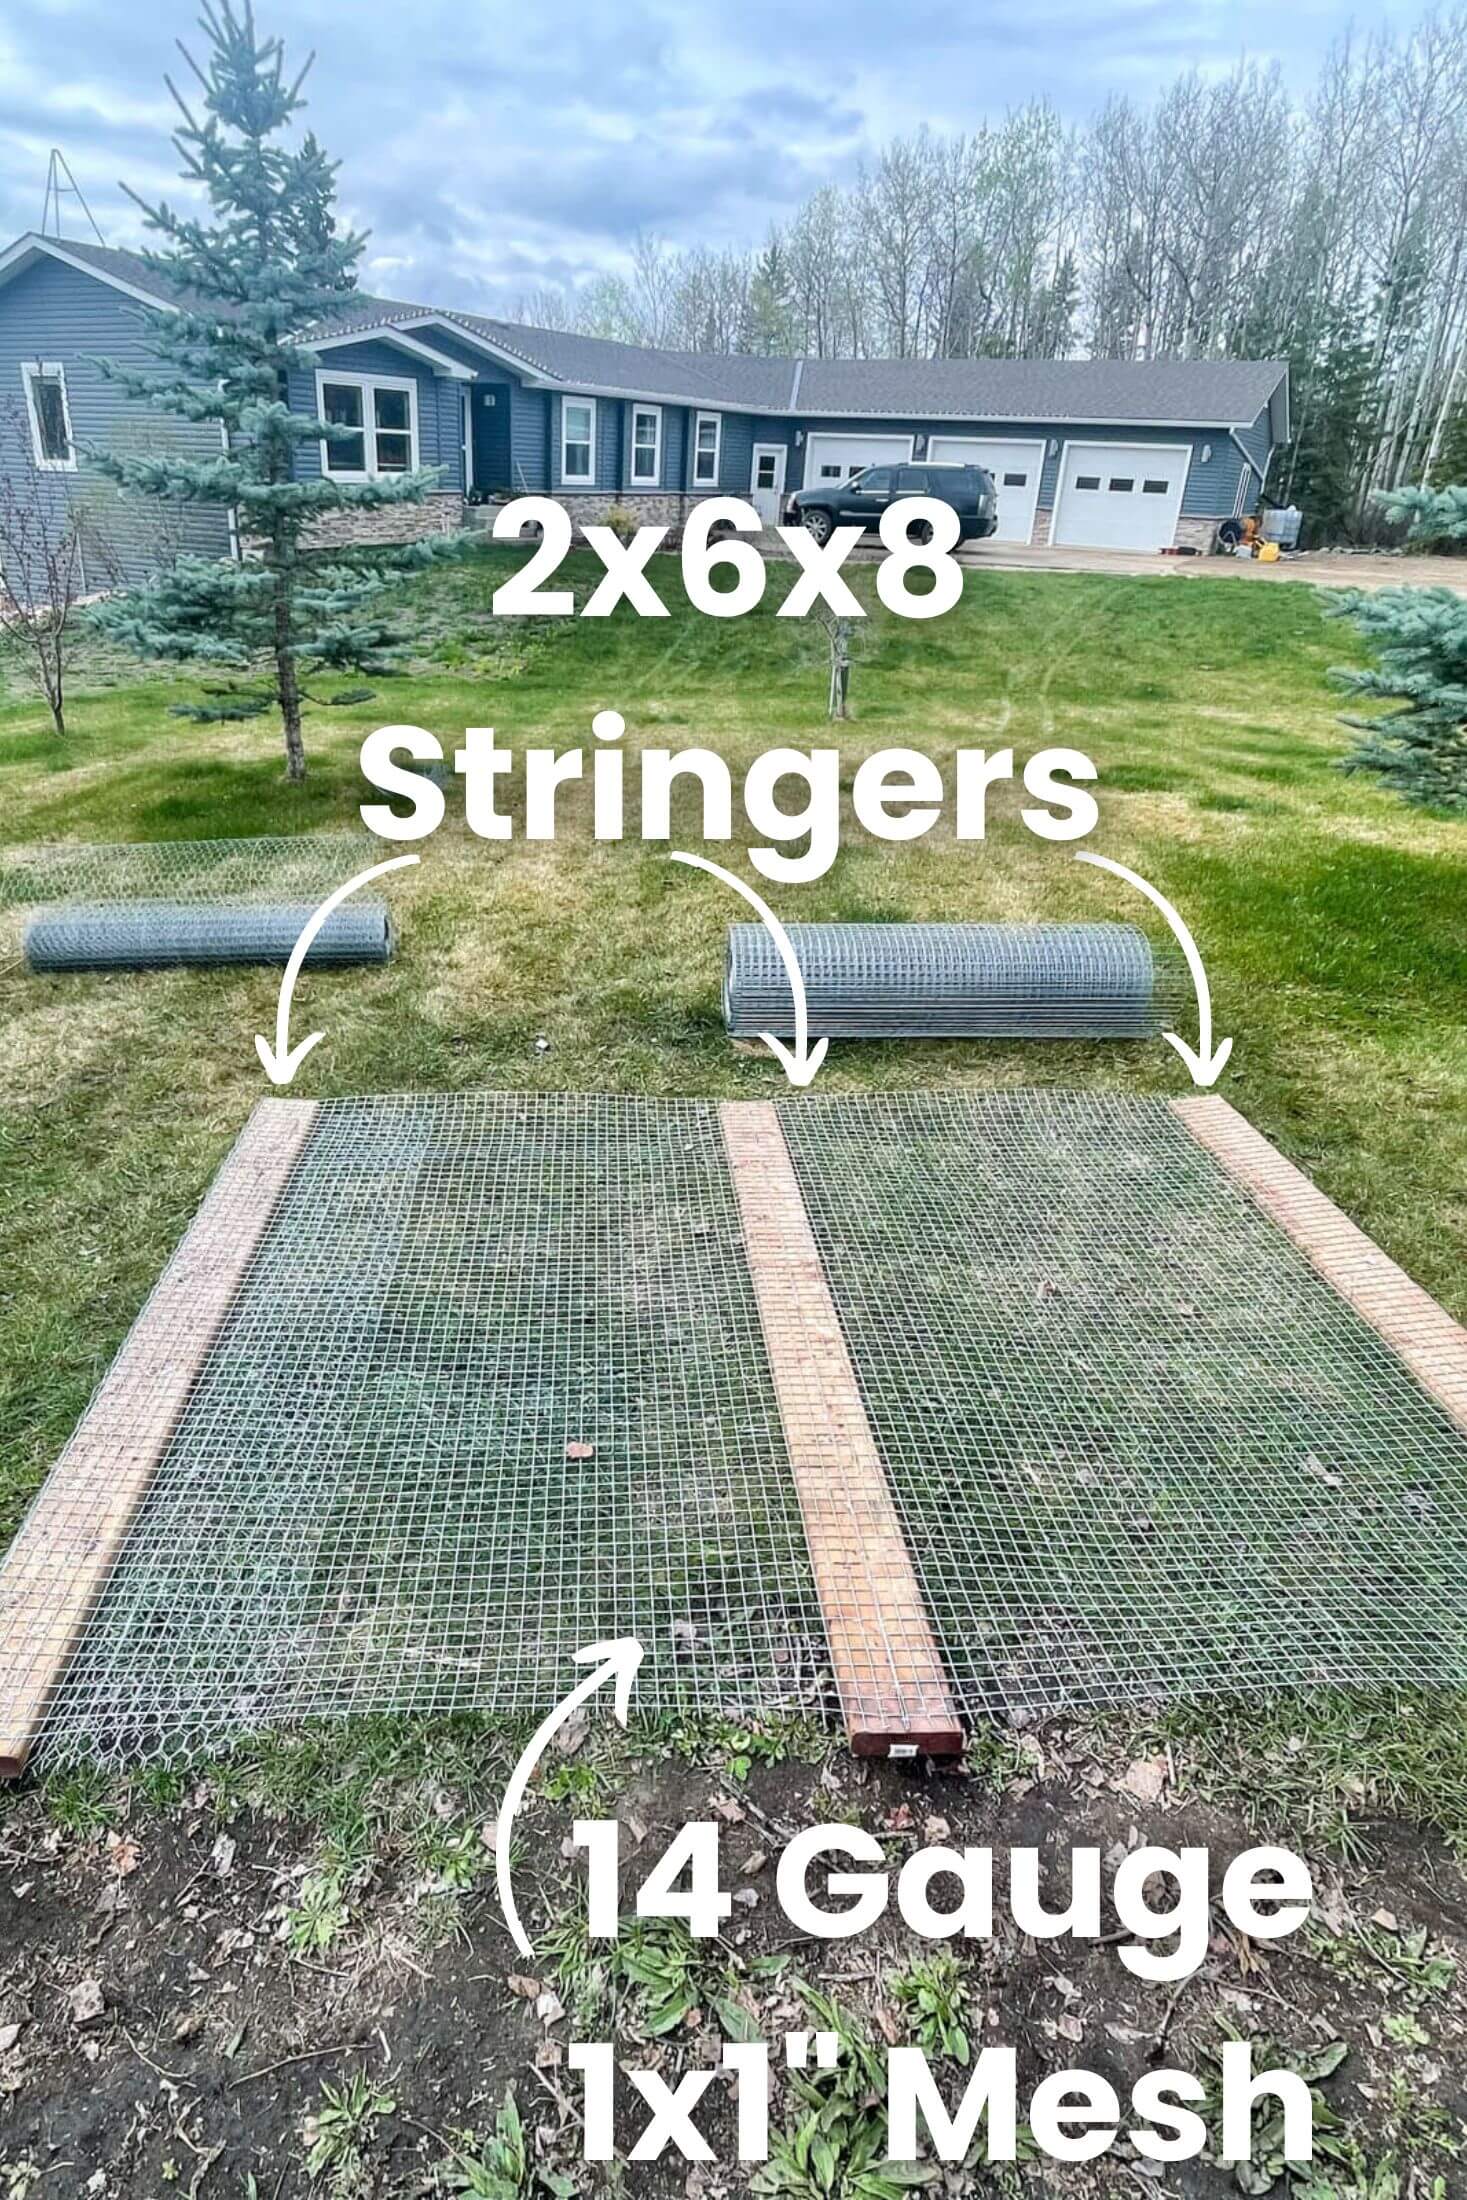
Fence Panels:
We purchased 48" tall, 14 gauge, 1x1 inch welded wire mesh from a local farm supply store to enclose the run. This wire mesh was very heavy, awkward, and nearly impossible to roll out and secure to the fence posts independently, so we used our 8-foot 2x6 stringers and the mesh to build our panels for the run.
This made the process much more manageable. Each panel was secured to the outside of the 4x4 posts, sandwiching the mesh in between creating a very secure fence.
Skirting:
Before we attached each individual panel to the run, we folded a length of 5' wide chicken wire in half and secured it to the base of each panel.
Because built the run in the forest, we did not want to excavate to bury the skirting, both to reduce the impact on the environment and the number of roots in the soil was incredible, and actually acted as a natural barrier and we were happy to leave them.
So we unfolded an almost 2-foot length of chicken wire and laid it flat all around the coop, doubling up any gaps and corners, and then backfilled it with heavy clay soil.

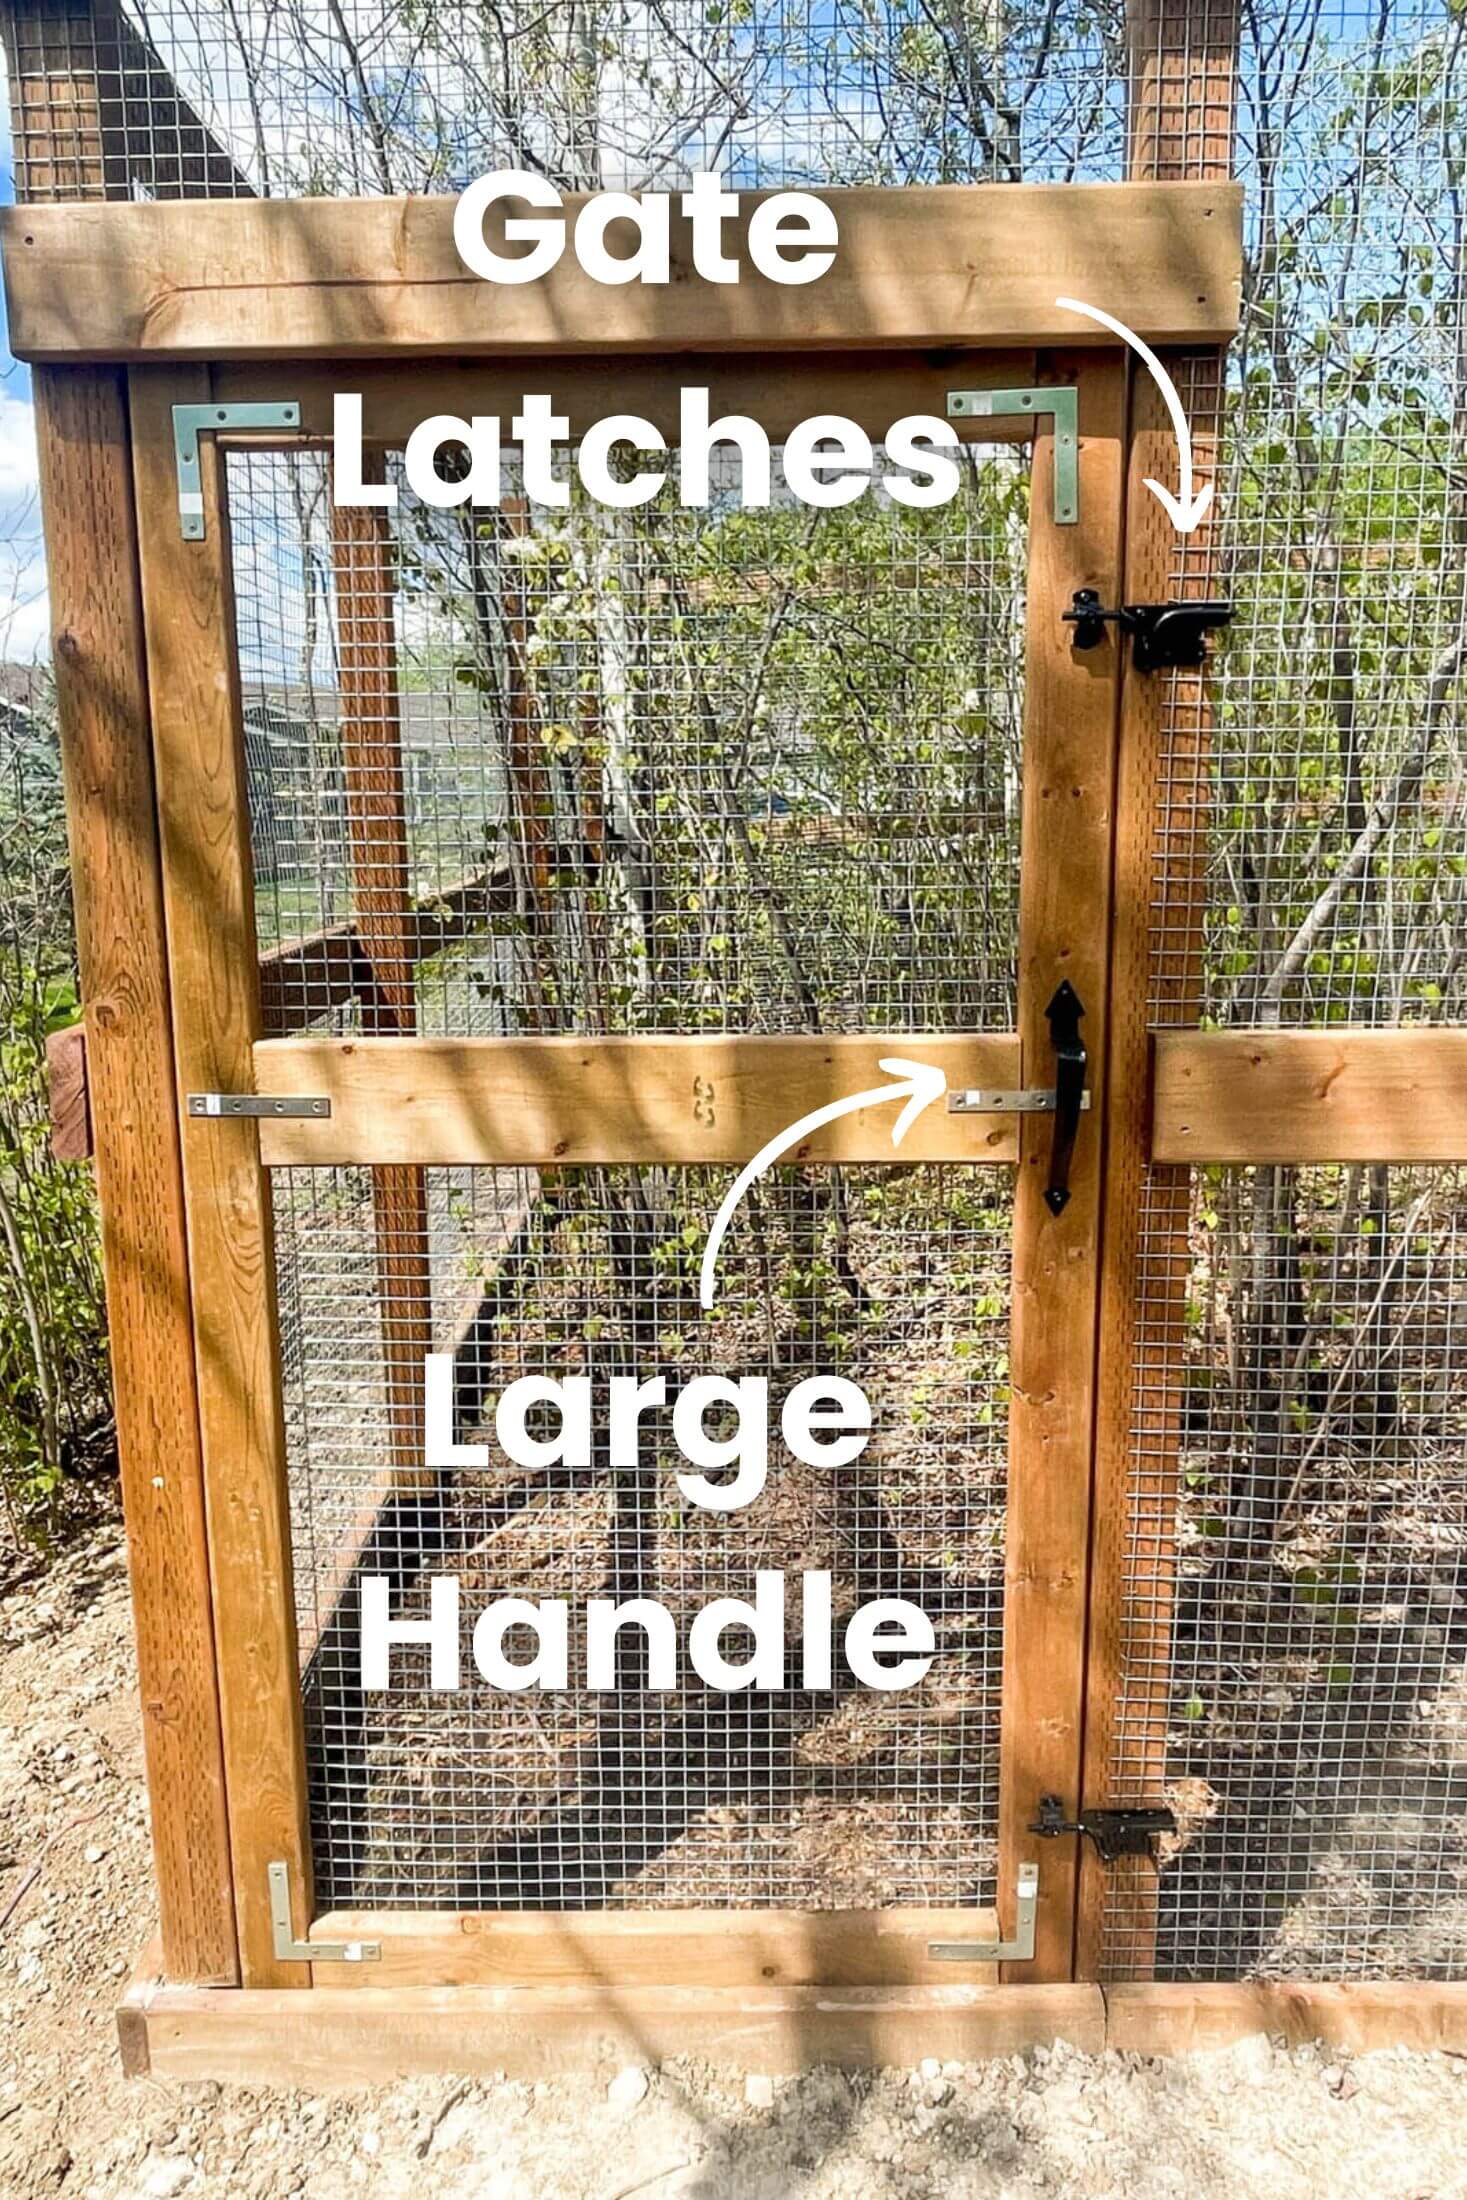
Gate:
Kevin built a simple gate out of 2x6s and we hung it swinging inwards to keep the exterior of the run flush.
We added a black handle that's easy to see and grab when you've got full hands, as well as two simple latches that require pivoting and then sliding to open to reduce the risk of accidental openings.
He framed the gate to match the run and secured the wire mesh to the openings.
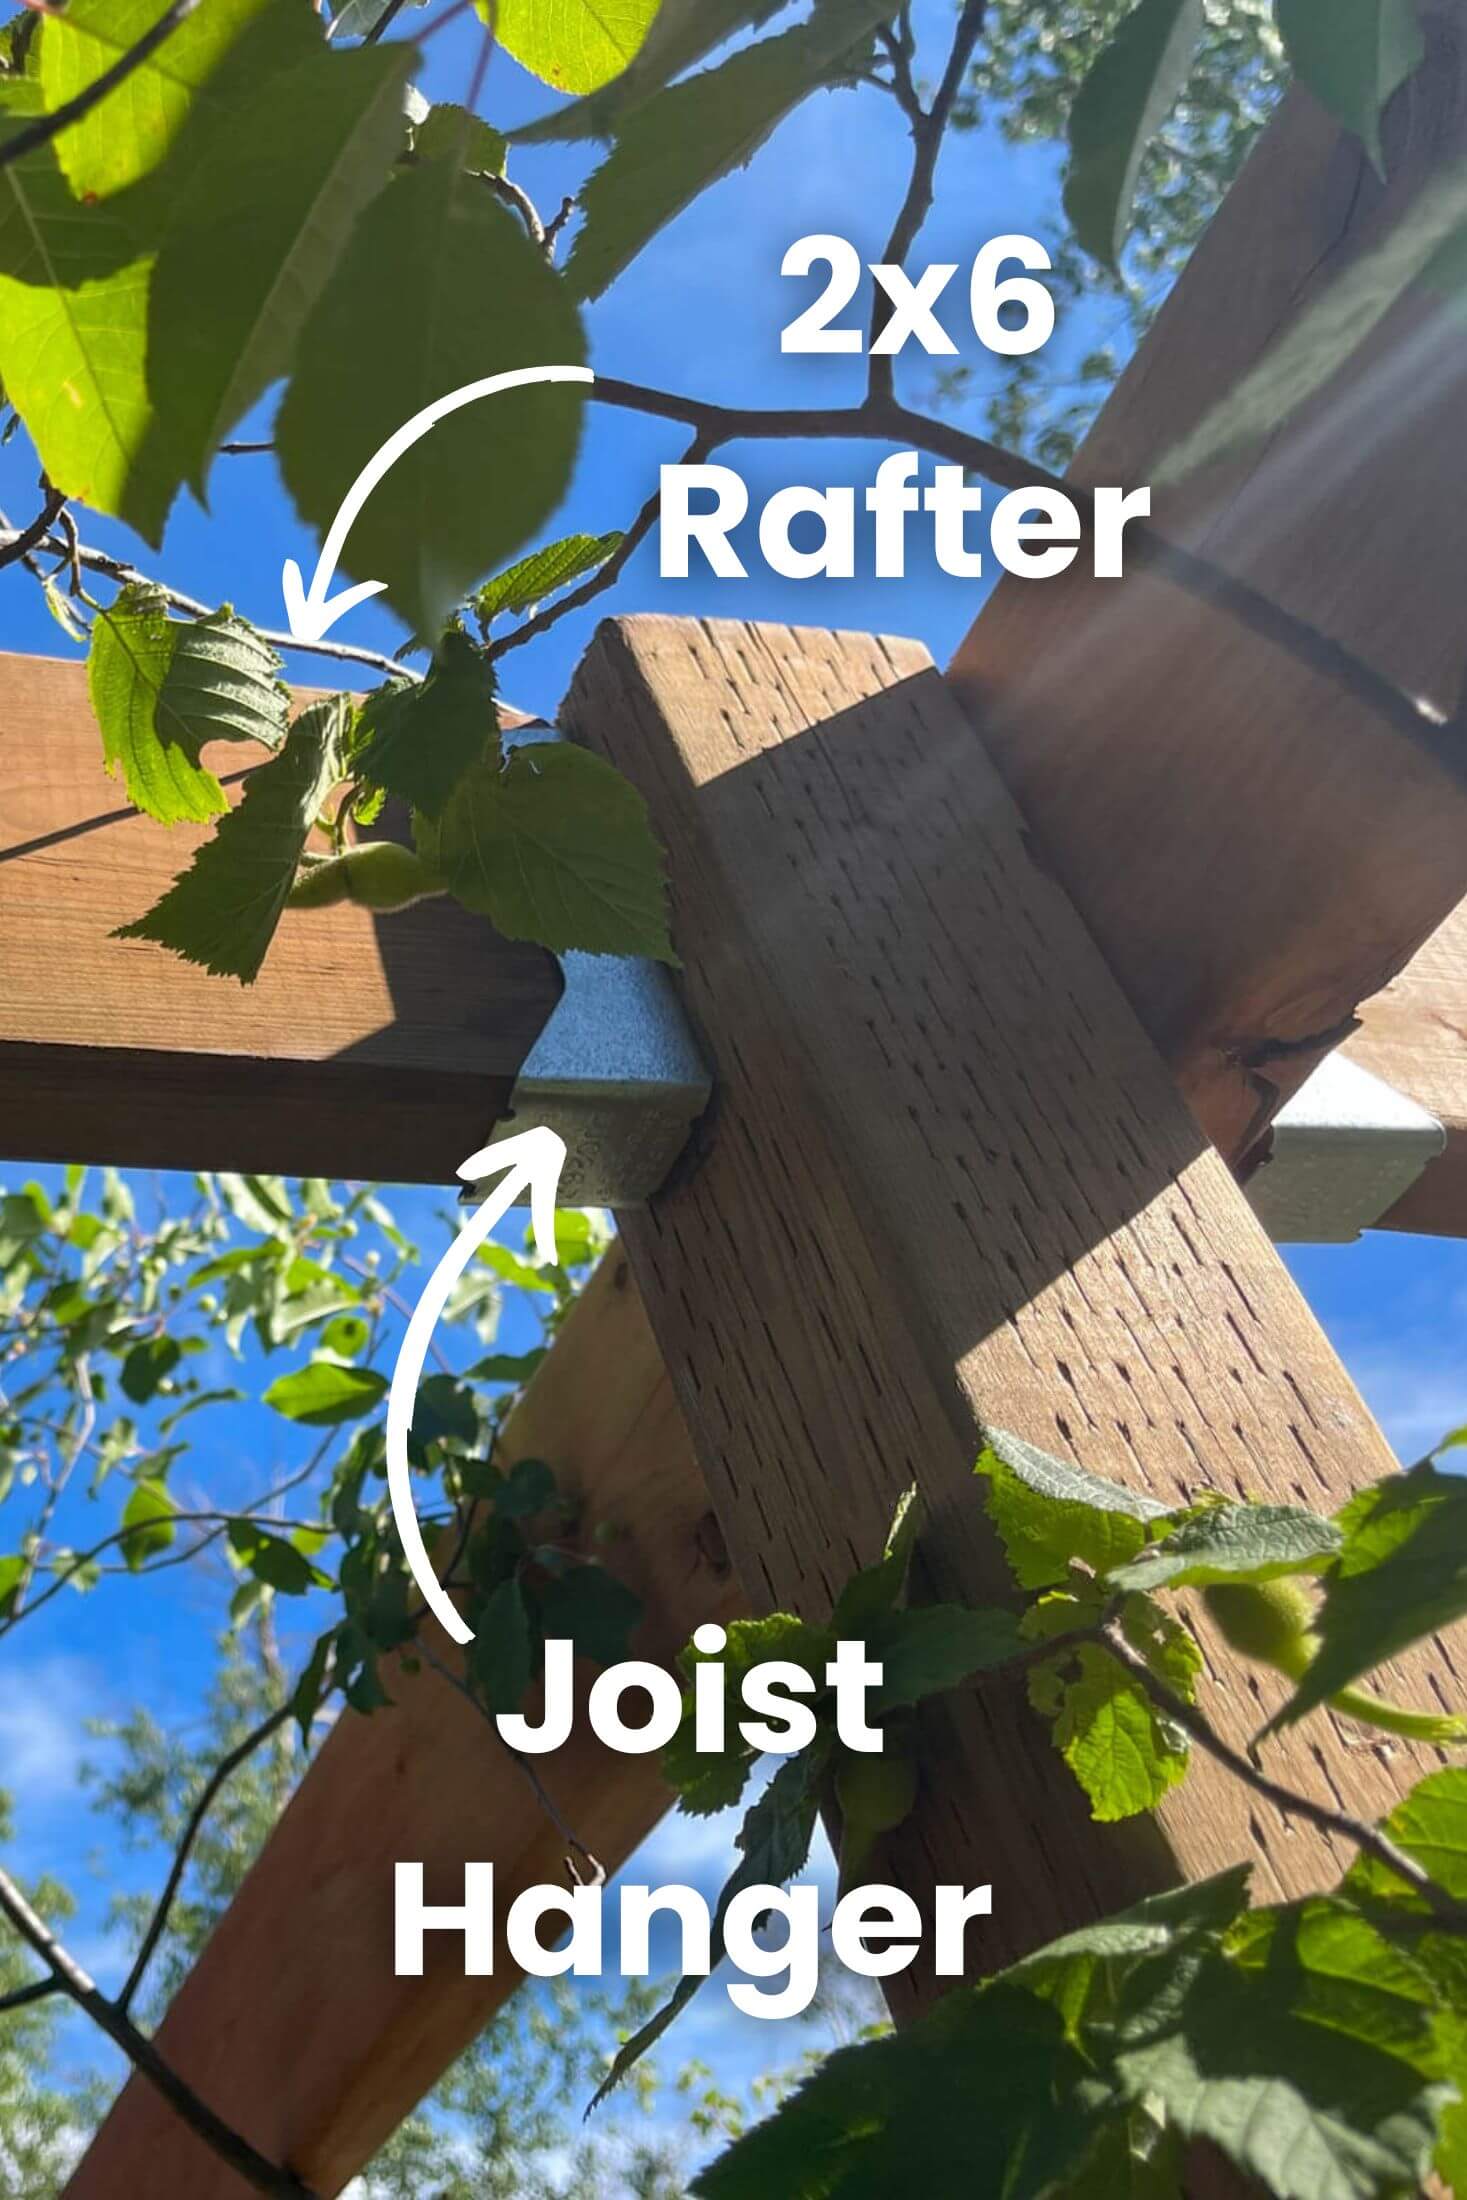
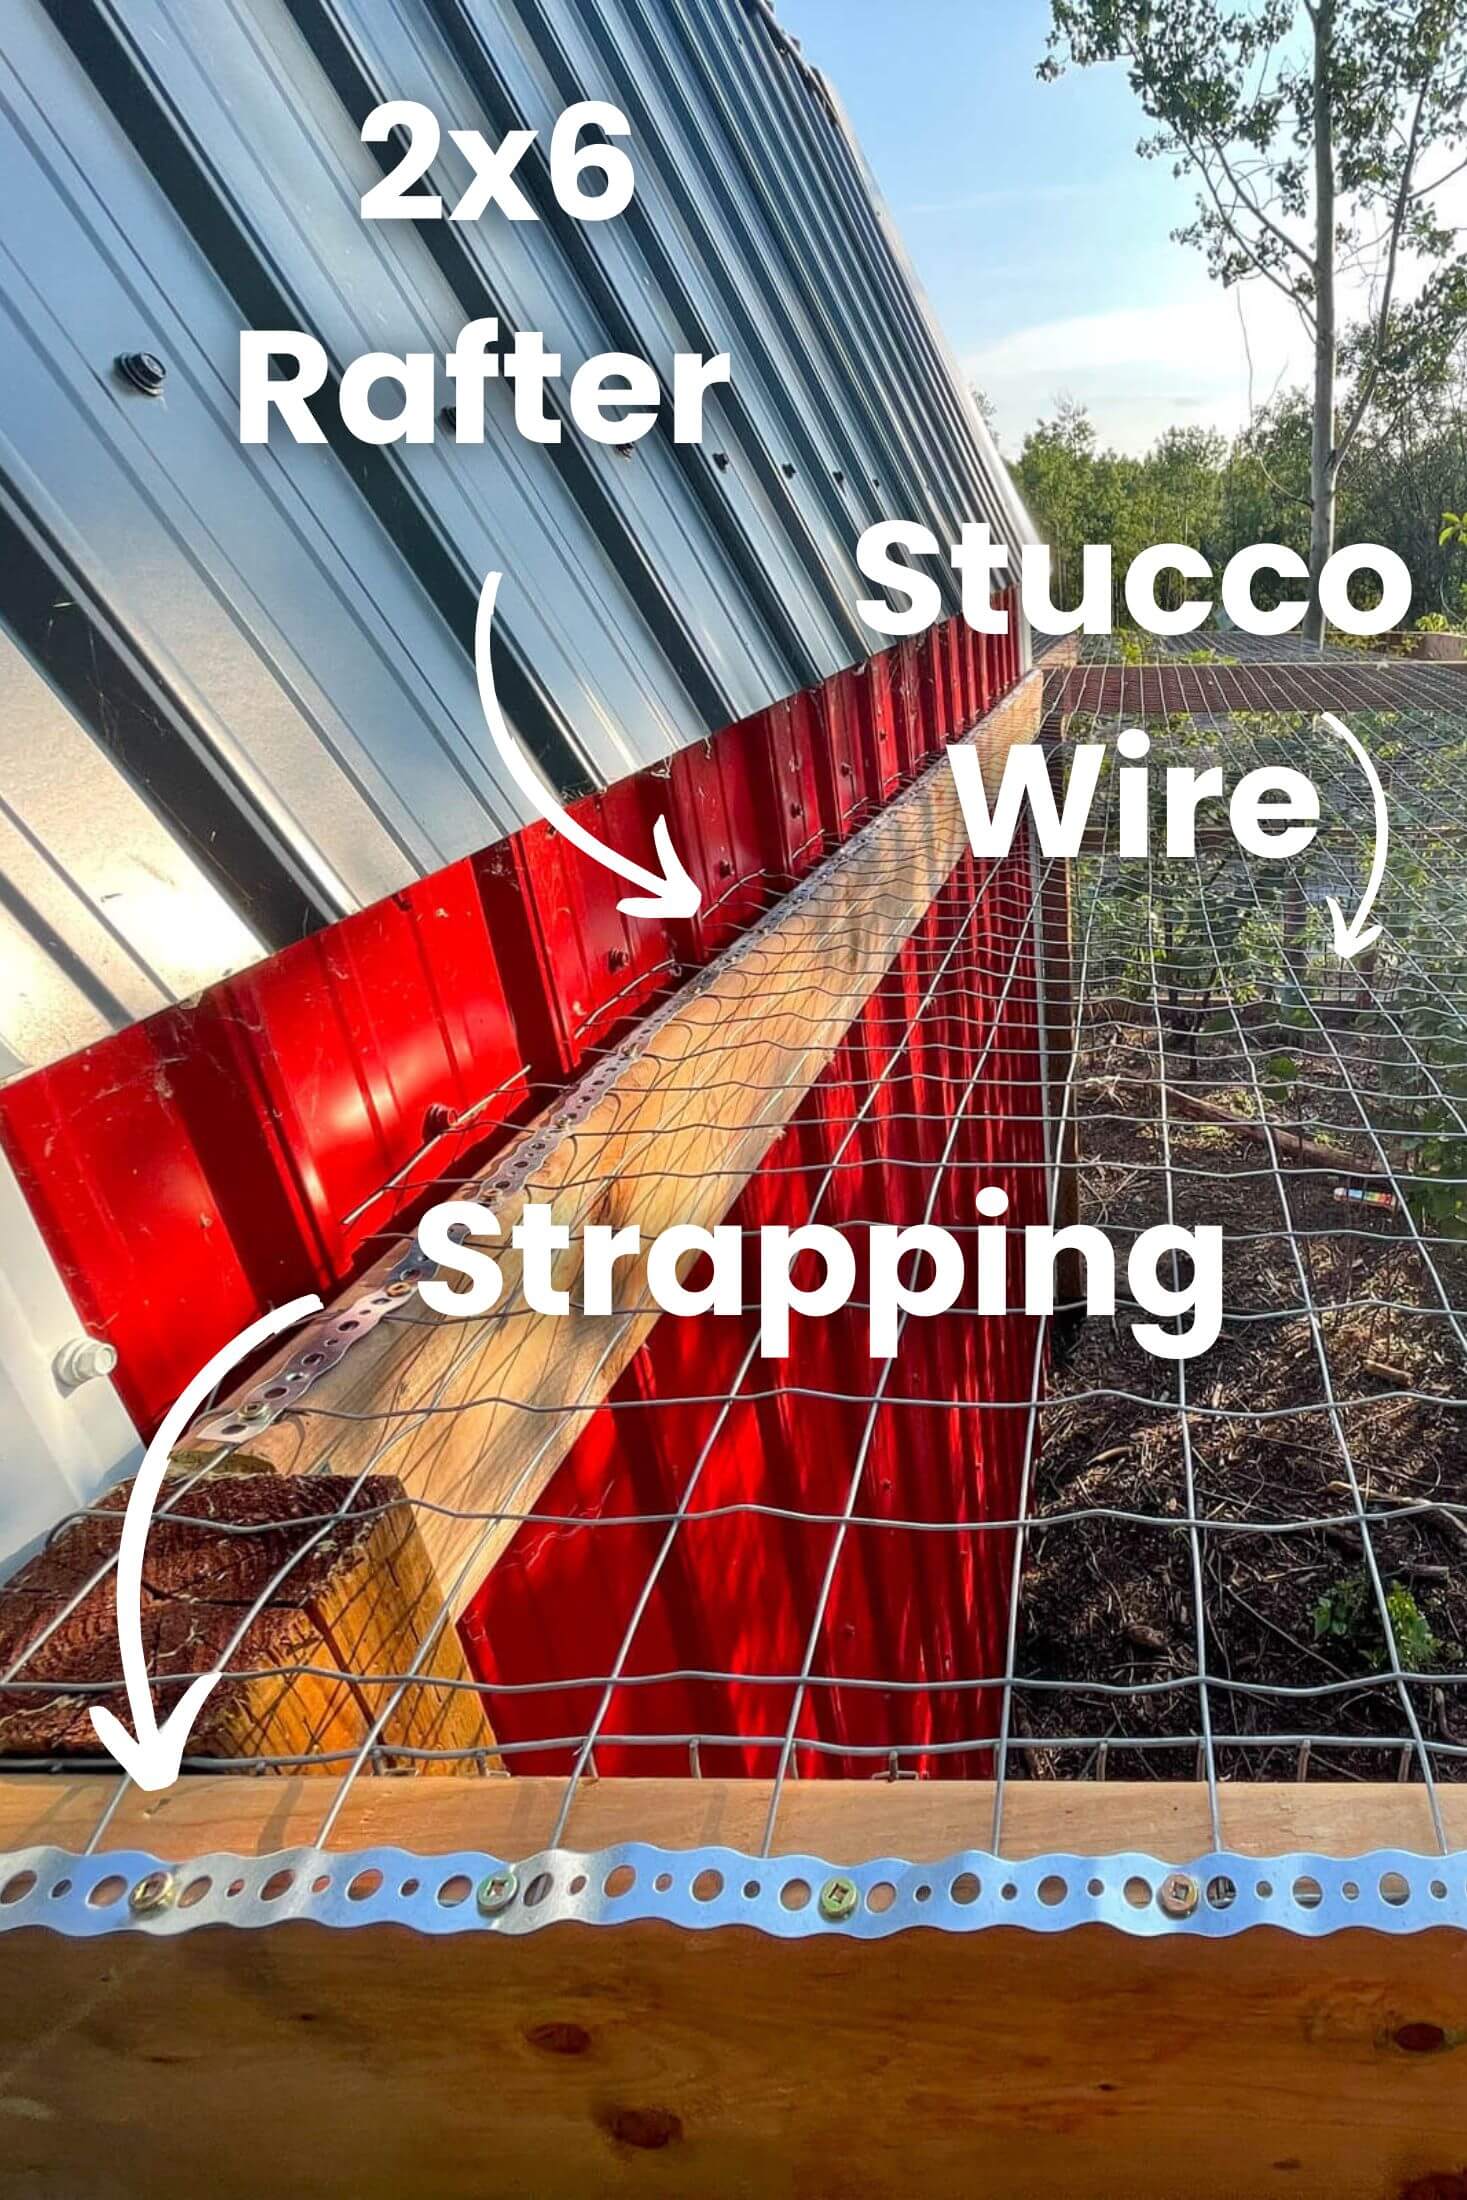
Roof / Cover:
Building the run in the trees created a great environment for the chickens, but also a great environment to allow predators to get to them. The trees provided shade but also a ladder for hungry fishers to scale and jump in the coop to snack on our chickens.
It was imperative to install a covering over the run, but we had to be smart about it! We did not want to add something that would block the sunshine and airflow that we feel is so important to the birds, nor did we want to have to create anything that had complicated structural needs to withstand snow loads or heavy rain events.
We settled on hanging 2x6 rafters with floor joist hangers and covered the run with 2x2 inch stucco wire and used multi-purpose strapping to secure the stucco wire. We felt this was a happy medium between providing security and allowing snow to shed.
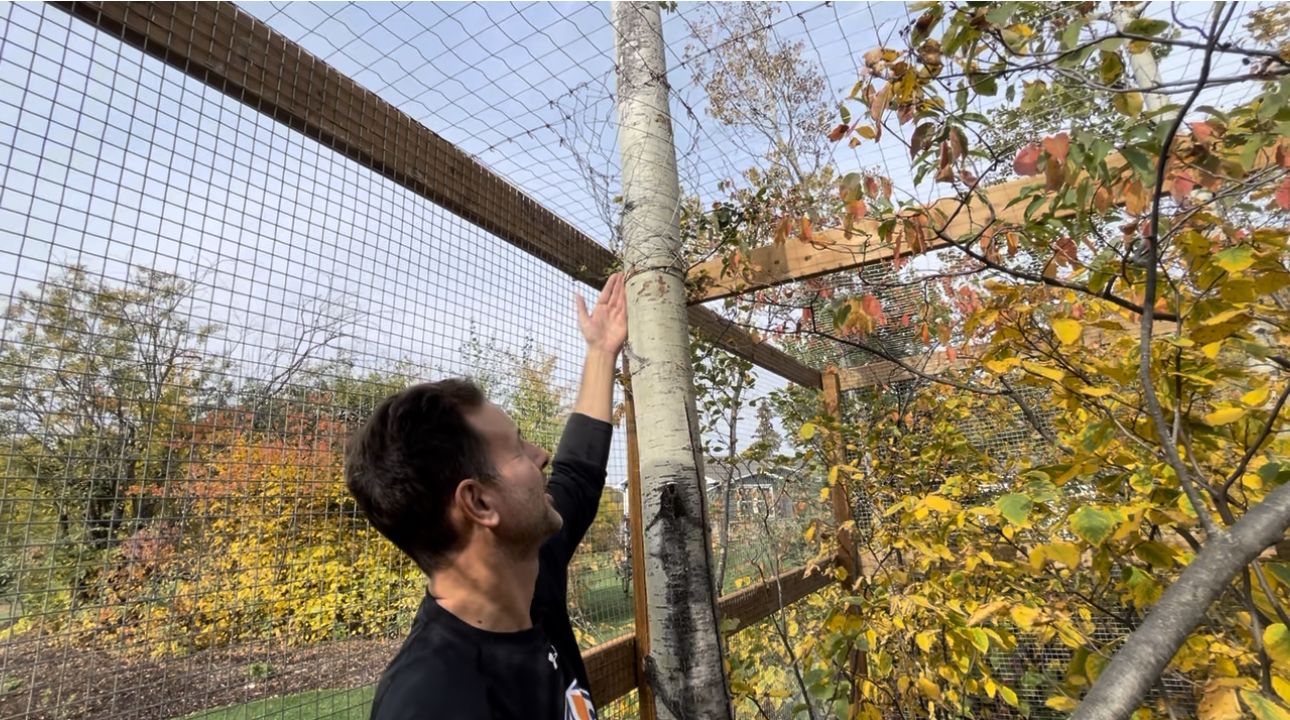
Dealing With Trees:
We left as much vegetation in the run as possible, and although it makes a few things difficult, it's been so worth the effort.
The saplings and trees create a canopy and provide shade for the birds in some form throughout the entire day. The run is basically a micro-climate - whenever we get hot while we're working, a quick break in the shade with the girls is all it takes to refresh.
Some trees in the run were larger than others, the smaller, flexible ones, we bent over underneath the wire mesh. For the larger ones, we had to figure something out.
Kevin cut the roofing mesh around each tree, leaving space for future growth, and tied up the mesh where required, then he made funnels out of the wire mesh and wrapped and secured those to both the roofing mesh and the tree trunk.
This both created a secure wrap around each tree trunk and allowed tons of flexibility for the trees to move and sway in the wind without damaging the roofing mesh.
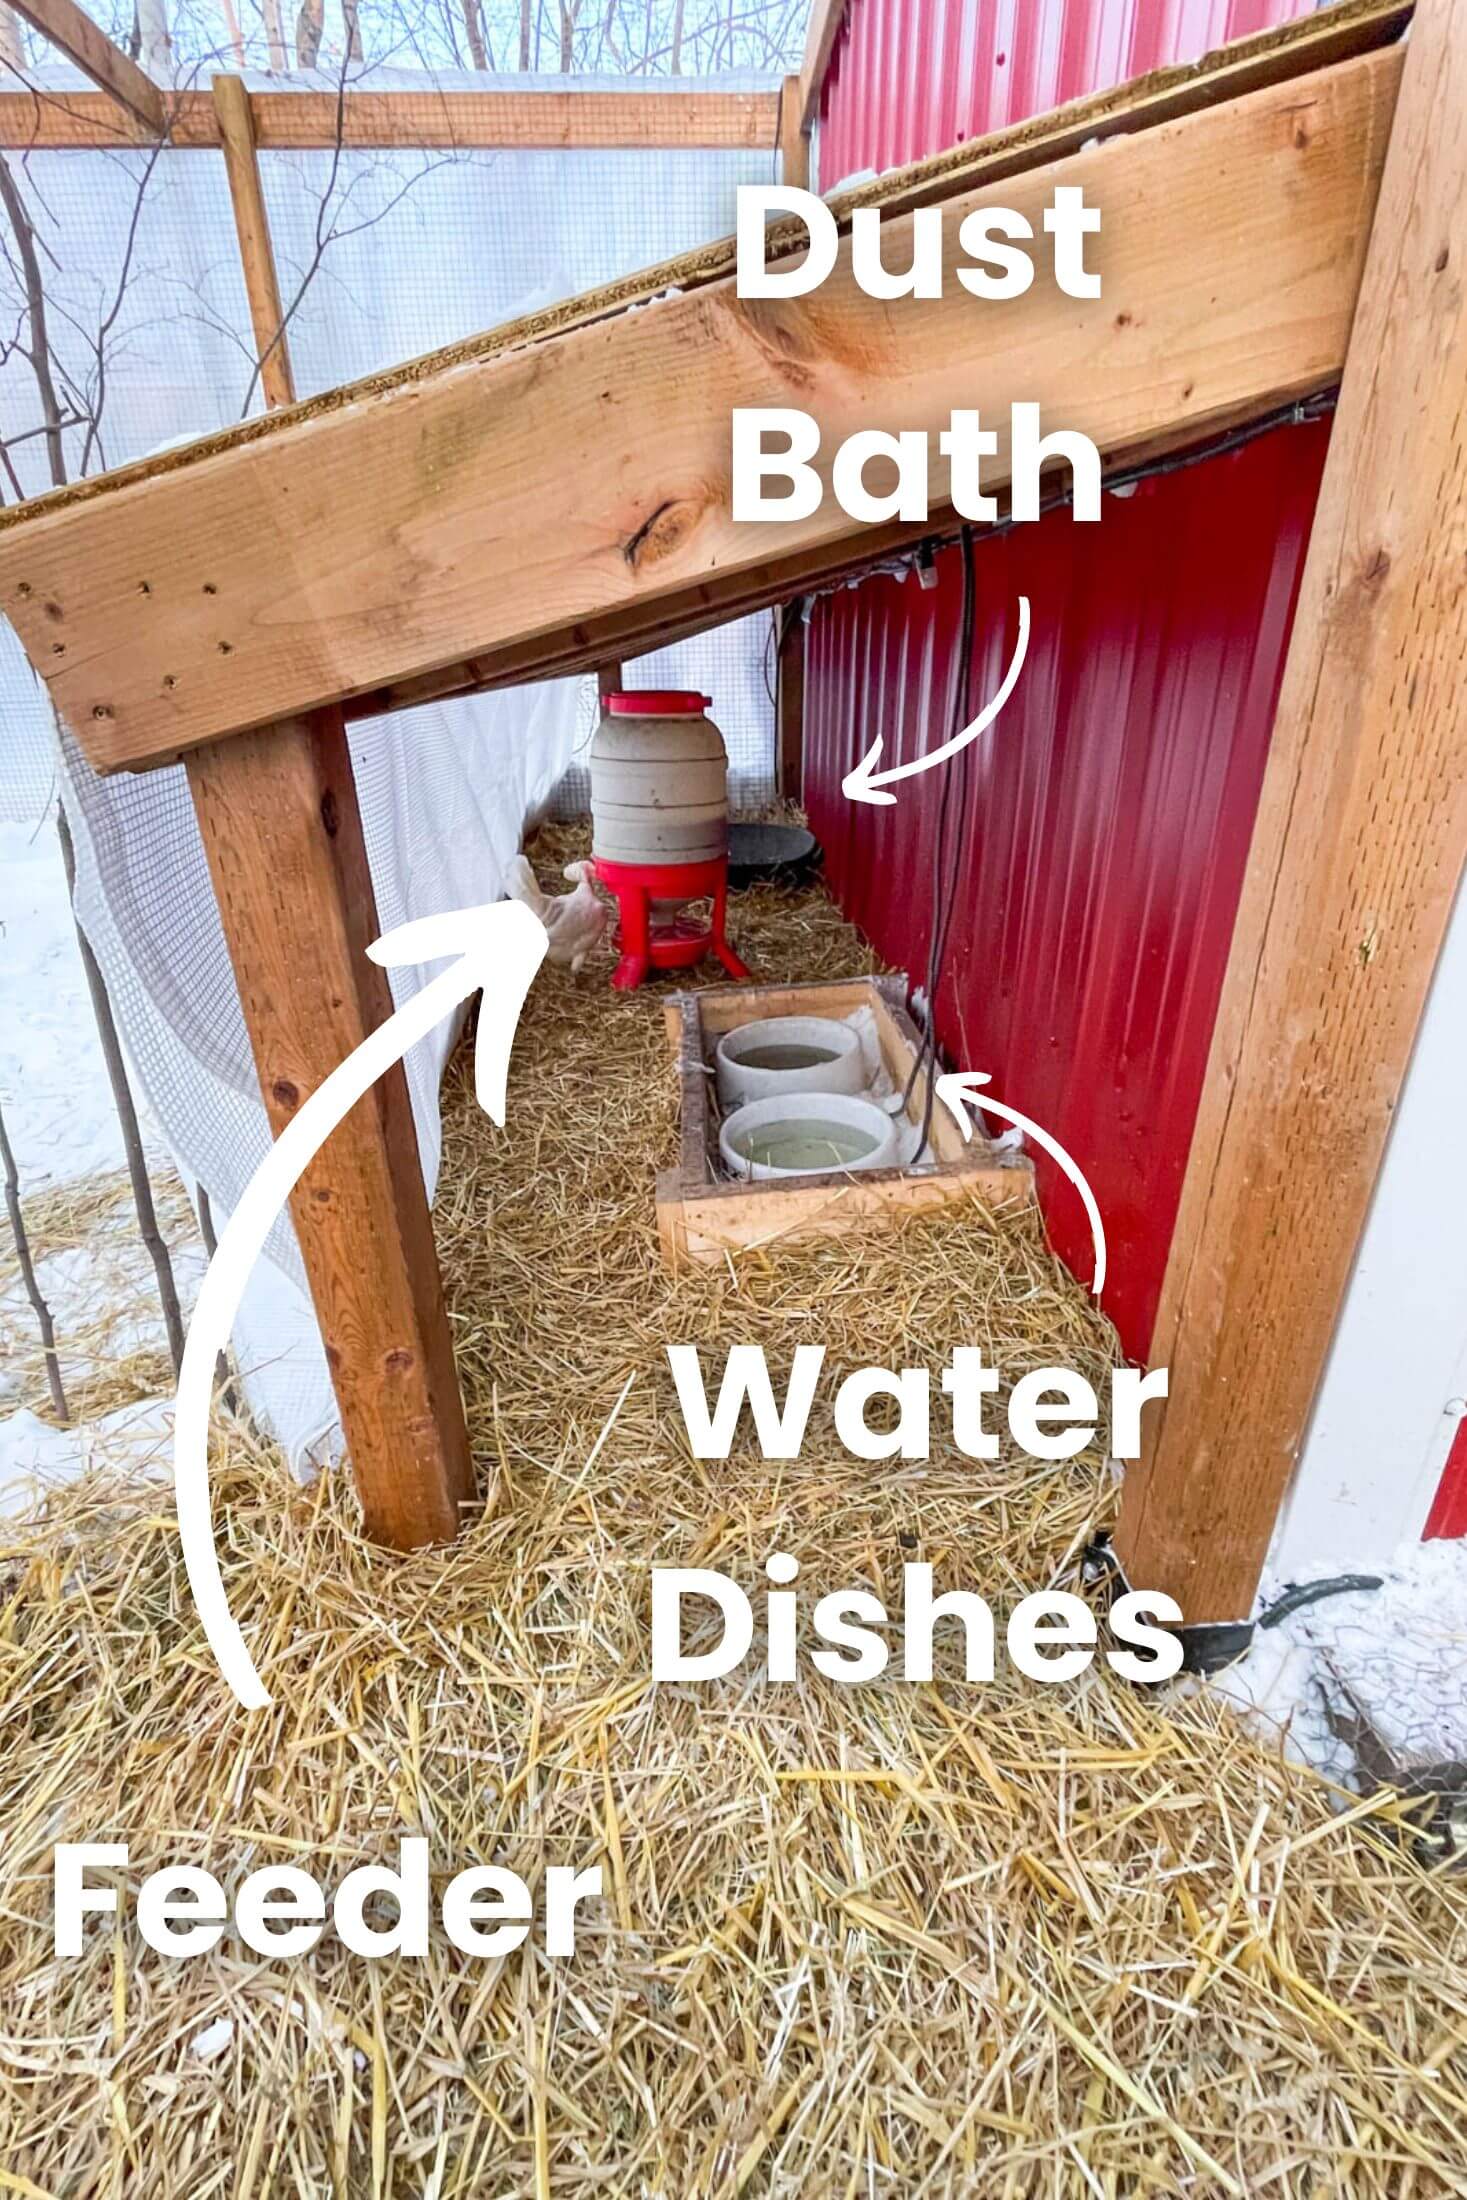
Chicken Lean-To:
By the time our first winter rolled around with the flock, we knew we had to have a place to store the dust bath, food dish, and water dishes out of the elements. Kevin came up with a great idea to build a lean-to on the side of the coop.
We used the same post spikes as the fence and built a heavy-duty frame out of 2x6s and added hinged plywood lids for easy access.
Landscaping Touches
Crab Apple Tree:
I love trees of all kinds and I love them everywhere, not just in my food forests! I happened across this gorgeous Rescue Crab Apple tree at a local nursery, it was in full bloom, and I was smitten.
I knew the perfect place for it was the southwest corner of the chicken run, as it matures it will provide some wonderful shade for our birds from the hot afternoon and evening sun.
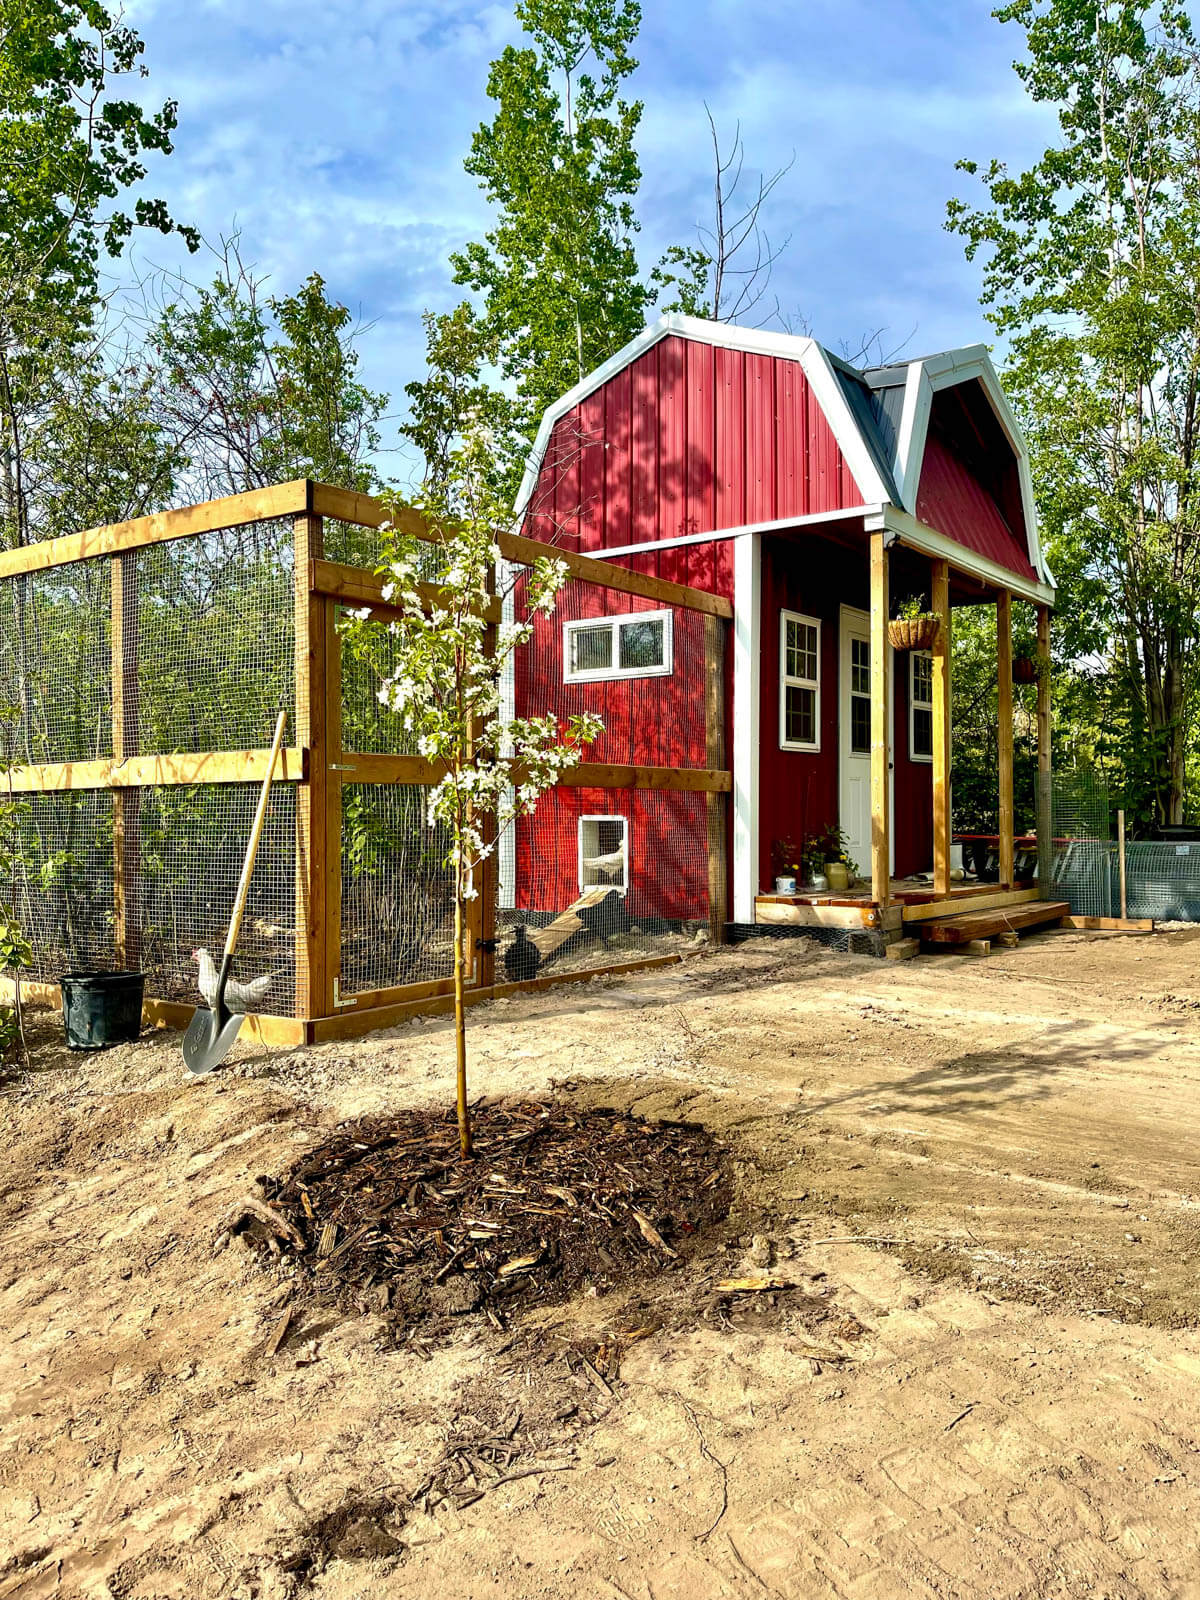
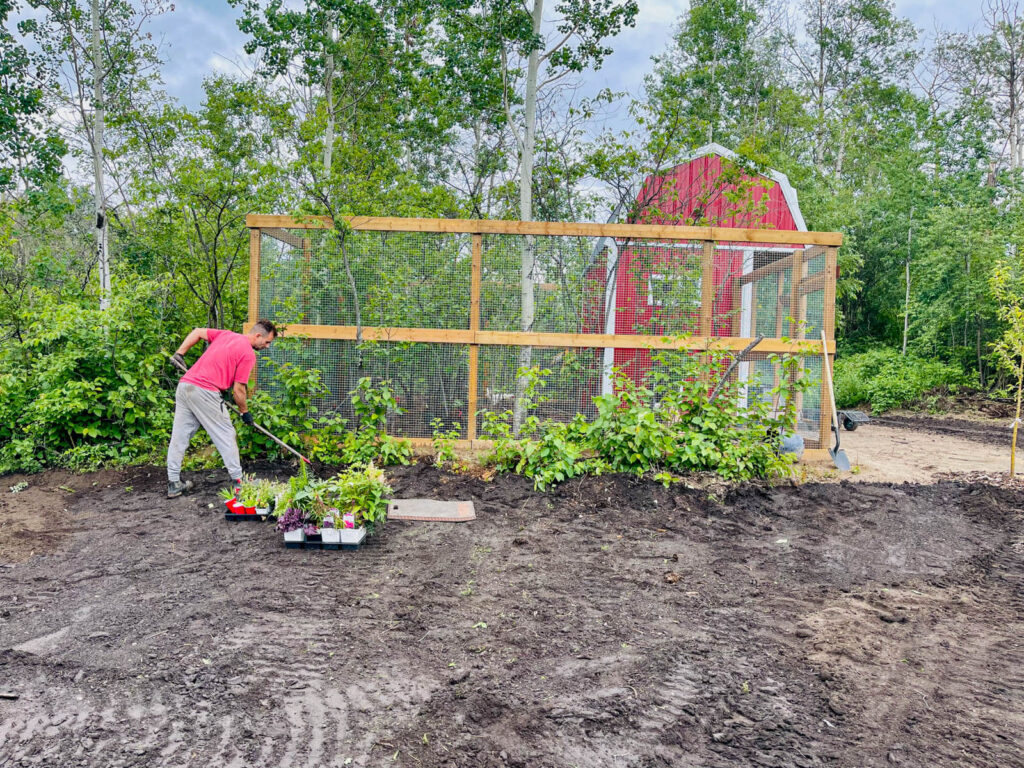
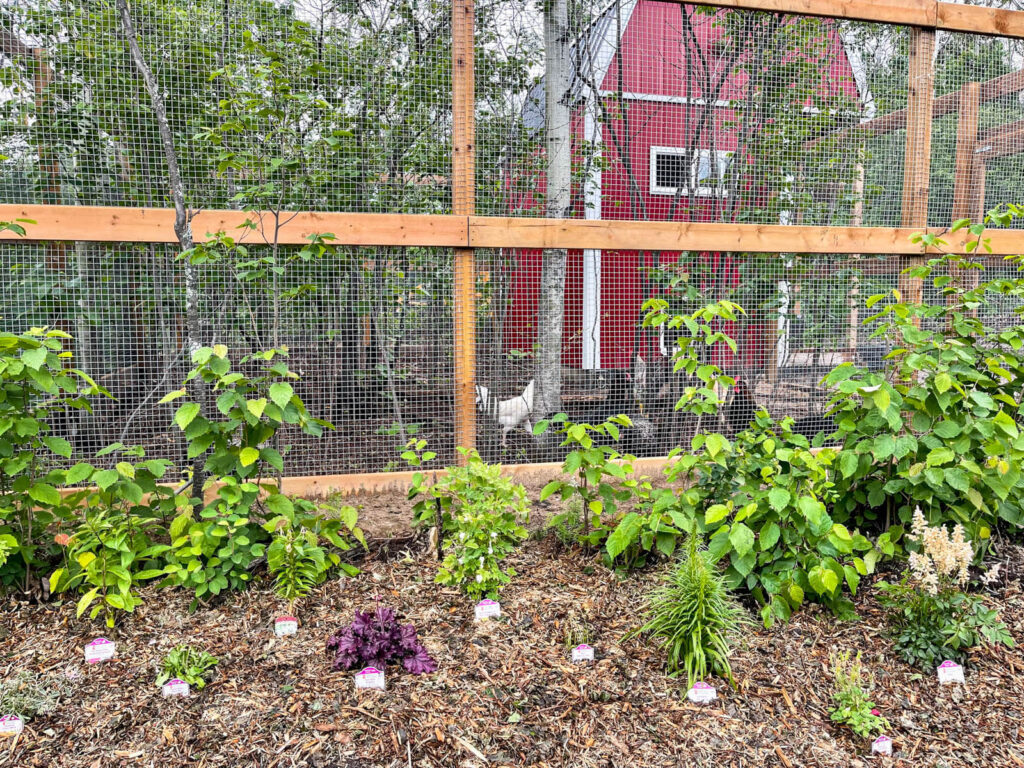
Perennial Flower Bed:
When we decided to set the chicken run right into the forest, we tossed around a few ideas. The final decision was to have the fence close to the edge of the bush line so that we could see the birds without the fence acting as the bush line.
This created a great little natural space between the coop and the yard and rather than laying sod in that space, Kevin and I filled it up with perennial flowers in 2022. Once the sod was down and we saw how much extra space we had for more flowers, we added a bunch more in spring 2023.
Mulch Walkway:
Our soil is clay based and that makes it very sticky and muddy when it's wet, so to keep the area in front of the coop a bit cleaner and tidier, Kevin hauled in some mulch and spread it around the front of the coop.

Future Plans
As of right now, we have no urgent plans with the coop. I'd like to say it's finished, but like any homestead project, it's not in its final form yet!
We've already talked about growing some vining plants up the fence, adding a companion tree to the apple tree, or maybe replacing some of the mulch with a stone walkway.
One thing's for sure, the ideas never stop. And neither does progress.
Coop Build Vlog
We chronicled the entire build of our coop and run on our YouTube channel!
Pin This Coop Tour

Great stuff. Chicken door (Run Chicken) is our greatest feature. Roof over the door and ramp is next. Topping the “best” list is the heated pet dish. We live near Millarville, Ab, yes, -40 for a week. Keep up the informative site, love the tips.
Glad you got something from it! It's been really fun to share and see what creative people are coming up with to solve problems!
Stay warm during this polar vortex!
Just read your blog about the beginning of your chicken experience and it was wonderful! So many really great ideas to blend your chickens with the surrounding nature yet being very mindful of their safety and predator pressure! Thank you for sharing your story!
So happy to hear you enjoyed it <3